Synthetic Voices
Stellar offers you the option to use Synthetic voices to render your Audio Description or Dubbing scripts.
The synthetic voice controls can be part of your layout, or by the icon on the top bar,  or the Top Menu Bar → Tools → Audio Tools → Synthetic Voices → Speak
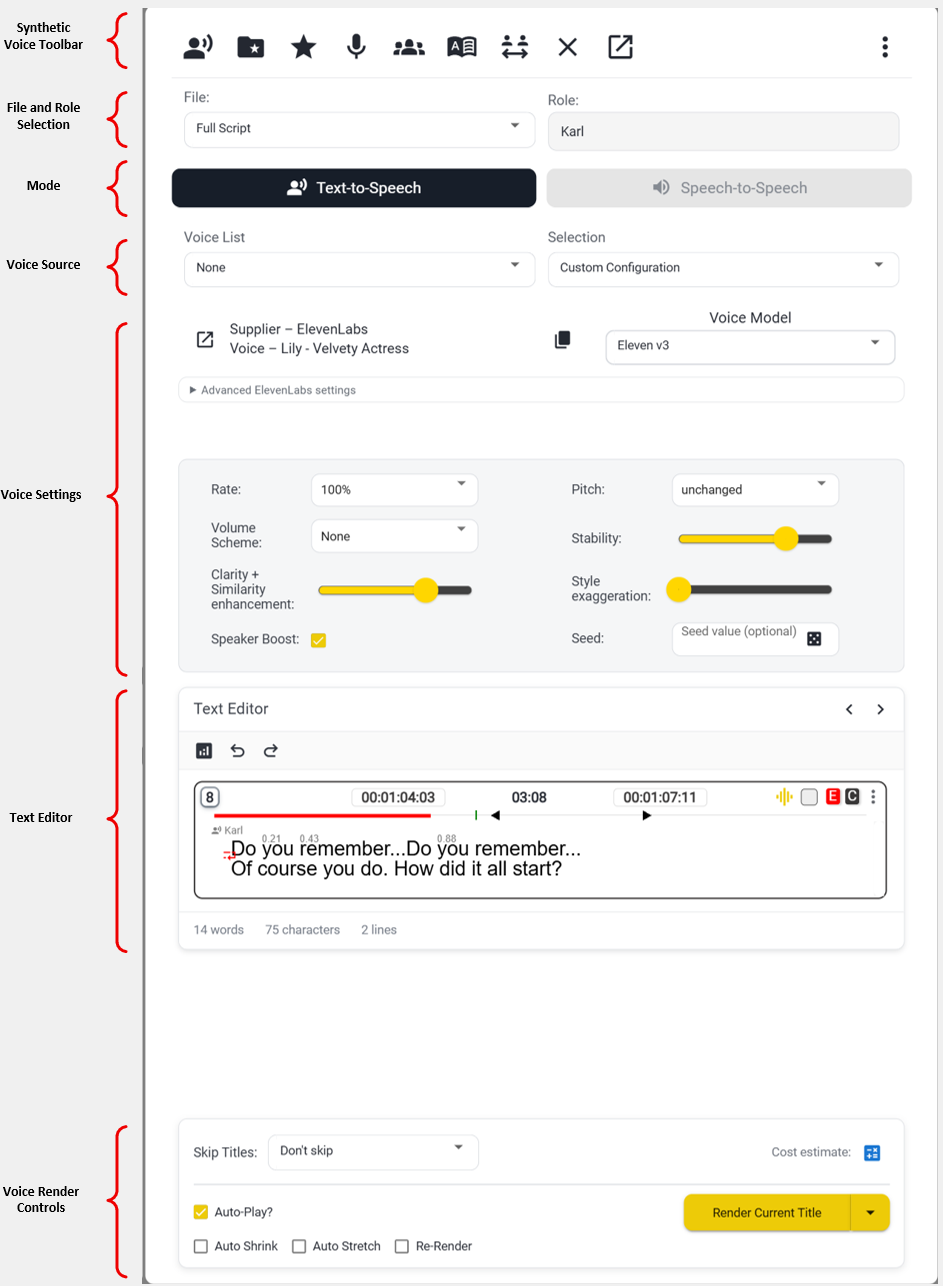
The synthetic voice controls are very powerful. Let's have a look at each section.
Sections
**Synthetic Voice Toolbar **
A set of shortcuts for working with synthetic voices.

 - **Select voice. ** Opens the voice selector dialog so you can select from one of several thousand voices. ### link to page section
 -** Favourites lists **. Opens the favourites dialog you can add and edit voices to favourites lists. ### link to page section
 - Add to favourites. Add the currently selected voice to the current favourites list.
 - Record and morph. The shortcut button to record and morph the current text. You will record your voice with the microphone and this will then be converted into the currently selected voice.
- Not all voice suppliers support voice morphing.
- Useful if you need to modify the speaking style of occasional lines in a script.
 - Open the casting dialog. Allows you to cast voice talent or synthetic voices for each role in a dubbing file. See for more details ### link to casting page
 -** Open phonetic dictionary dialog.** Select, create, or edit phonetic dictionaries.
- This also allows you to select a phonetic dictionary for the current file. This can be used to modify the pronunciation of words and names. See here for more details. ### link to Phonetic dictionary page.
 - Open the voice cloning dialog. Allows you to clone audio from the current task and create new voice models. See here for more details. ### Link to voice cloning page
 - Clear the current voice selection. If there is a voice set for the current Role in Casting then this voice will be selected by default.
 - Open the synthetic voice controls in a new window.
**
**
File and Role Selection
Select which Role in which file you're going to record.

File: - Select which file in the current task you are working with. This will default to the currently selected file and in most cases you will only have one.
Role: - select which Role in the current script file you want to record.
Mode
Select which mode you want to work in.

Text-to-Speec****h - the text of the currently selected title will be rendered into a audio using the selected voice.
Speech-to-Speech - the active audio of the currently selected title will be converted to a new voice using the selected voice. This will retain timing, intonation, emphasis, etc.
Voice Source
**Select the source synthetic voice you're going to use. **

**Voice list: **- select which favourites to use or none.
Selection - three options.
- If a favourites list is selected then this will list all available voices in that favourites list
- If none is selected:
- Use role's voice configuration - this will automatically select the voice assigned (cast) to this role, if any. This is the default selection.
- Custom configuration - select and configure a voice from the full voice list from any of the voice suppliers.
Voice Settings
Set the controls for the selected voice. This allows you to control how the voice will sound.

At the top is the current voice selected. This will change either by manual selection, when you select the voice from the voice favourites list, or when you select a role which has a voice set in casting.
Depending on the voice supplier selected, and if you have an API Key set for that supplier you may see some options.
 - Open the dashboard for your account with the voice supplier.
 - Copy the ID for the selected voice to the clipboard. This can be useful when looking up te voice on the voice suppliers website.
Voice Model - Some voice suppliers support more than one Model.
Some controls are available for all voices.
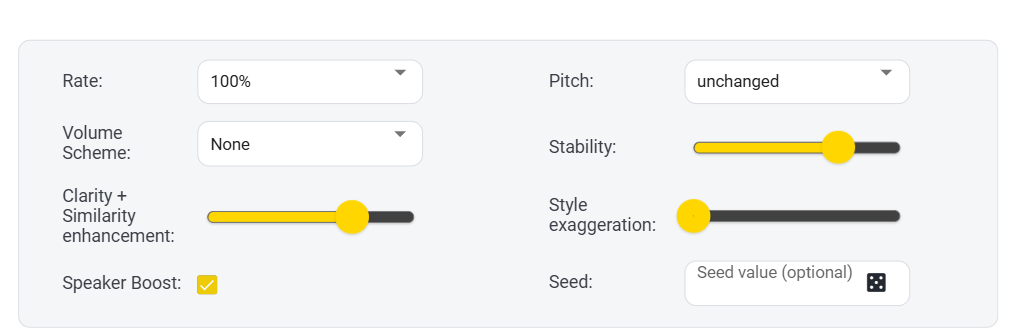
** Rate - **control how fast the voice speaks.
**Pitch **- control if the voice speaks at a higher pitch or a lower pitch.
Volume scheme - control how loud or quiet the voice speaks.
- Not all voices from all suppliers are at the same level. Setting the volume scheme in a favourites list or when casting a voice is a very useful feature.
- Set different voices at different volumes to get an even balance.
All other voice settings are dependent on the voice selected.
All voice settings can be stored as part of a favourites list or when a voice is cast to a particular role in a dubbing file.
- In a favourites list, you can have multiple variants of each voice.
Text Editor
The text editor within the voice widget allows you to directly edit the currently selected Title. Some layouts do not have a text editor so you can still edit the current Title while you focusing on the voicing.
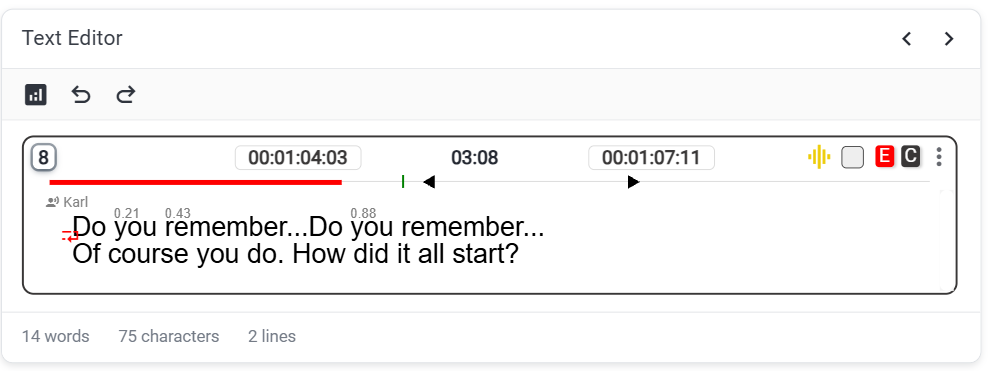
Controls:
** Open File Status button** - opens the File Status dialog with all the errors, warnings, casting and other information for the current script file.
** Undo and Redo buttons **- Undo or redo the last few text changes.
** Next/ Previous Title** - click on the left or right arrow to move to the precious or next Title.
Voice Render Controls
This section controls the creation (Rendering) of the spoken audio.
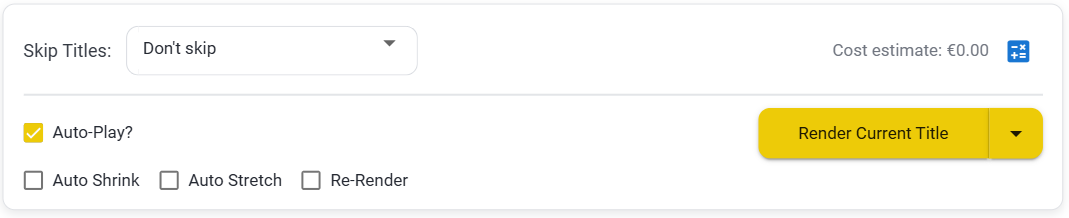
Skip Titles - Handles how titles which already have audio will be treated. - Only applies in All Titles or a Range of titles modes.
- Don’t skip - Will render all titles.
- Skip all audio types - Will skip all titles which already have an audio.
- Skip human audio - Will skip all titles which already have human recorded audio.
- Skip synthetic audio - Will skip all titles which either have STS or TTS generated audio.
- Skip TTS Audio - Will skip all titles which have Text-to-Speech audio.
- Skip STS Audio - Will skip all titles which have Speech-to-Speech audio.
Cost Estimate - shows an estimate of how much it will cost to render the selected text using the curent voice.
Auto Play - If selected the new audio will play as soon as it is created.
**Auto Shrink **- If set the new audio will be adjusted to match the text box if it is over length. The pitch will be unchanged but there may be a small reduction in audio quality.
**Auto Sretch **- If set the new audio will be adjusted to match the text box if it is shorter. The pitch will be unchanged but there may be a small reduction in audio quality.
Re-Render - If set the audio will be re-rendered at a different speed if it is over length. This will retain the best audio quality but will increase the total cost.
**Render Control - **click on the down arrow to set the mode. Click on the main part of the button to do the selected Render.
- **Render Current Title **- Will render only the currently selected Title.
- Render All Titles in recording Range - Will render all titles withion the Marked recording range (red highlight) allowing for the Skip Titles selection.
- Render All Titles - Will render all titles allowing for the Skip Titles selection.
Voice Selection
There are a number of options for selecting the voice you want to use:
- Select a standard voice from one of the Voice Suppliers
- If you have one or more Favourites List(s) then you can select from the preset selection.
- If the voice has been set in the Casting controls, the voice will be selected automatically.
- You can design a voice to your own specifications - Only available with Elevenlabs with a private account key.
- You can clone a human voice to create a new stored voice. Legal limitations apply. - Only available with Elevenlabs or Deepdub with a private account key.
Voice Selection
To select from one of the large range of voices available, click on the Select Voice button at the top of the Synthetic Voice Widget
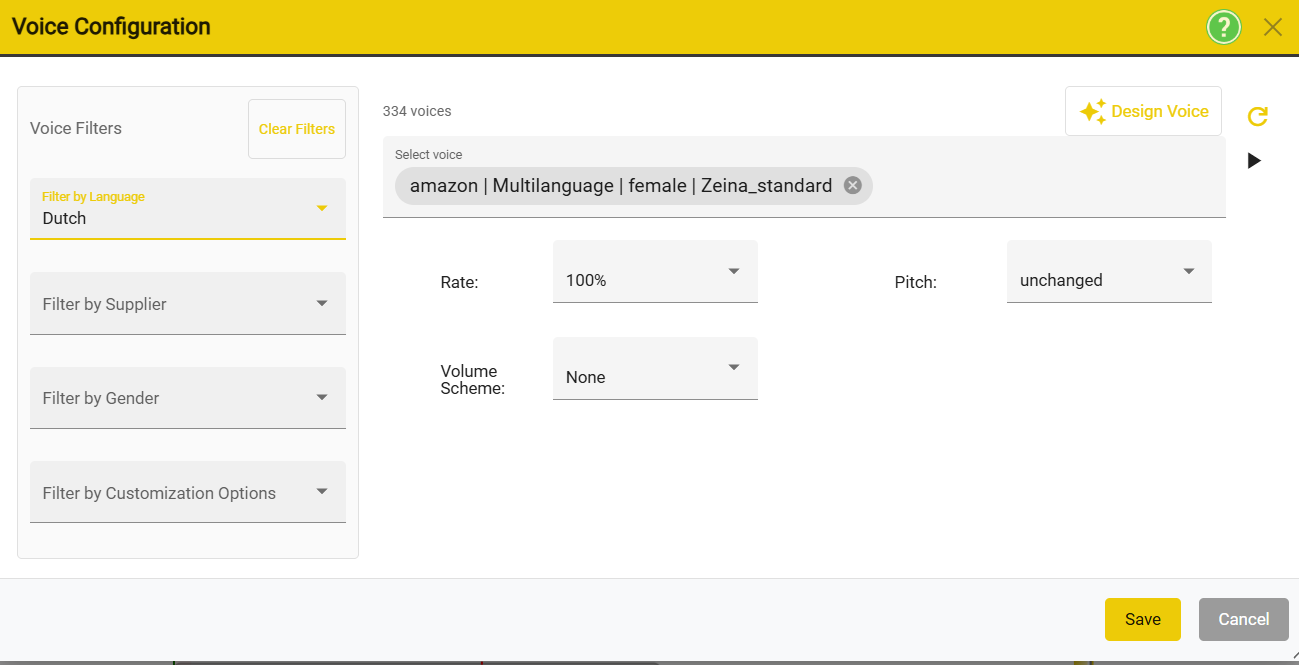
Use the filter section on the left to narrow down your search for voices.
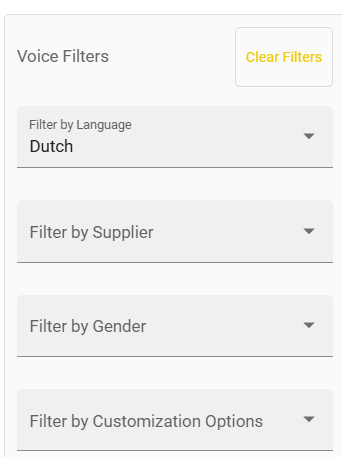
You can filter the list of voices by:
- Language - Note: some suppliers offer mult-lingual voices that will speak in different accents depending on the text language
- Supplier - Select one of the voice suppliers if you have a preference
- Gender - some voices are marked up with a gender
- Customization Options - Some voice suppliers support style or emotion modification for some voiecs.
To pick a specific voice click in the Select Voice box. You will see a dropdown with a list of all voices that match the filters set.
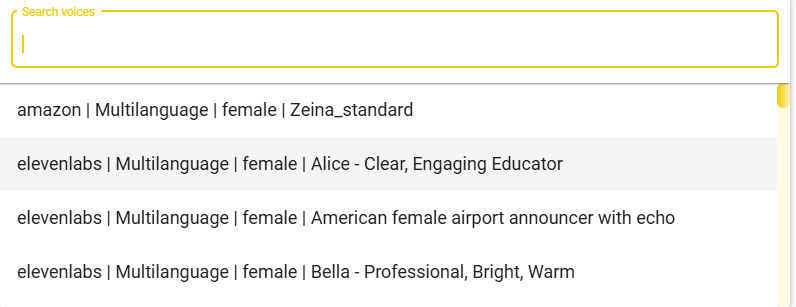
Select a voice from the list.

You can click on the Play button to hear the selected voice speak some standard text (in English).
Hint: If you change the filter settings clcik on the refresh button to update the list. 
Once a voice is selected you can adjust the settings available.
Note: The adjustments available will depend on the voice supplier and the voice selected.
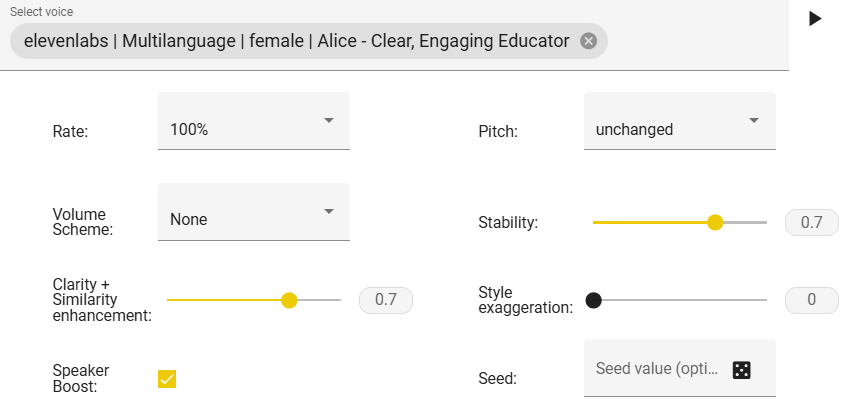
As you make adjustments, you can click on the play button again to hear the effect of the changes.
Once you are happy with the voice, click save. This is now the current voice.
Voice Designer
If you have a private account set up with Elevenlabs, you will also see the option for a voice designer button at the top of the voice configuration page.

Clicking on this will open the voice designer dialog or going to Tools, AI tools, synthetic voices, voice designer on the top menu.
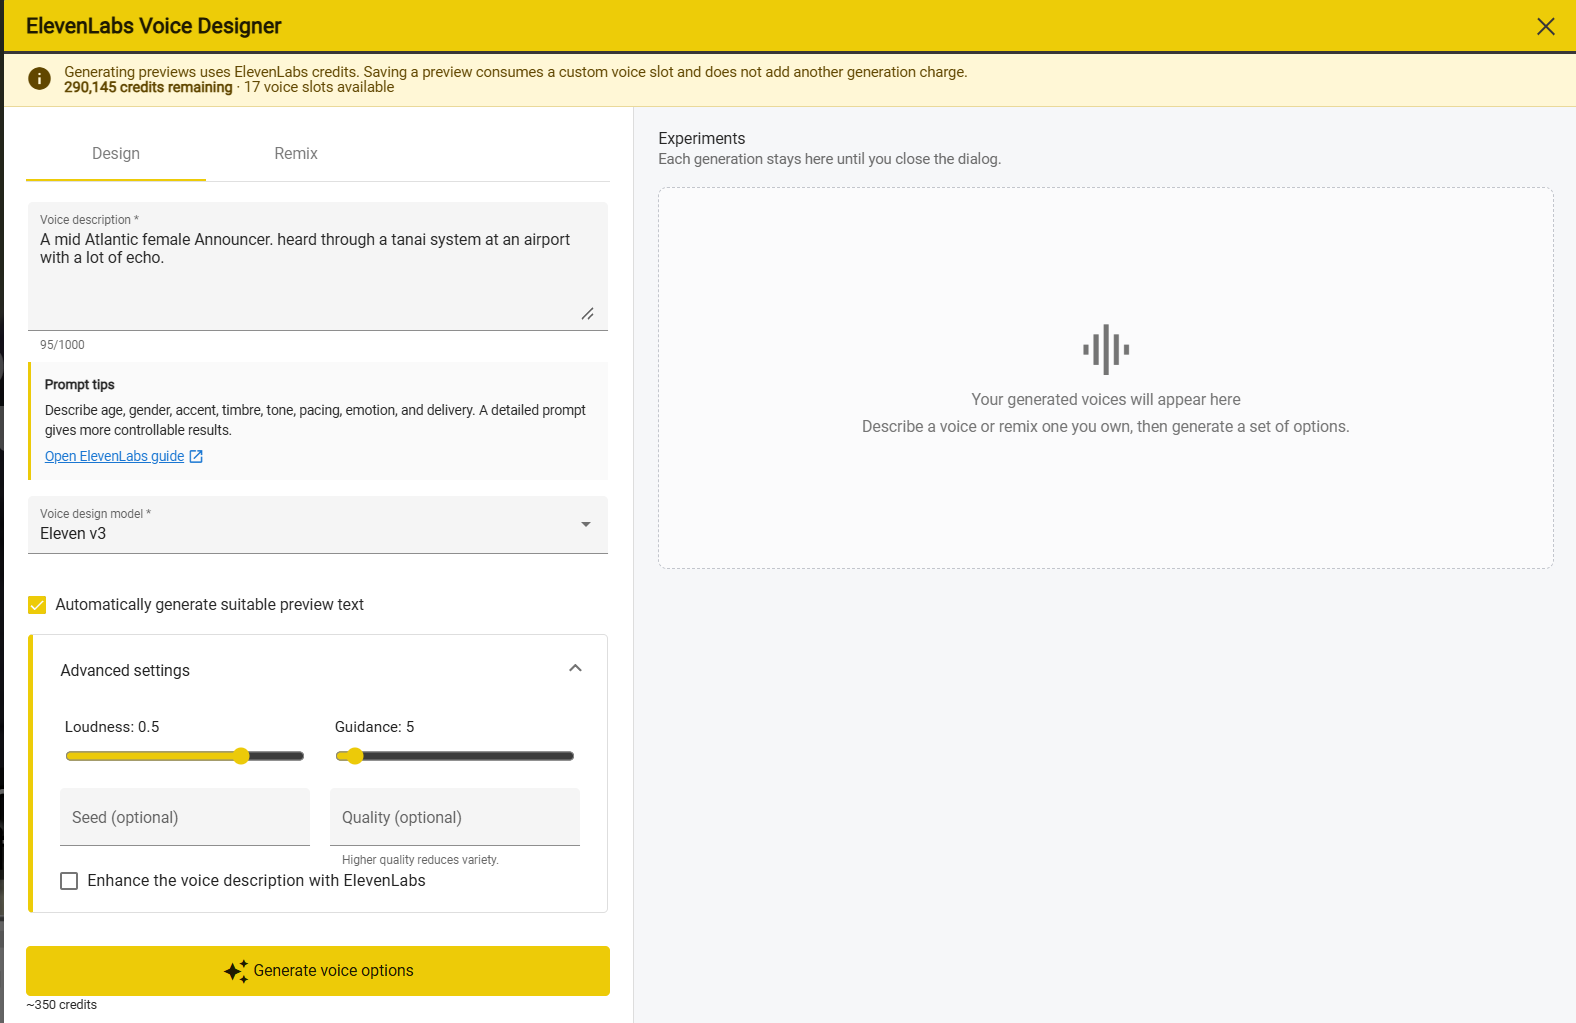
The Voice Designer is a feature provided by Elevenlabs: for more information see Voice Designer Help
You can create a completely new voice by describing how you want it to sound. Listen to the voice, make adjustments And when you are happy, save.
Once you have generated a new voice, this will appear on your list of Elevenlabs voices. Just select it like any other voice.
Voice Favourites Lists
Favourite lists allow you to have preselected lists of voices. These can be either selected per series, per client or just your company favourites.
You can have as many lists as you like, and each one can contain as many voices as you'd like.
Creating a new Favourites List.
**Open the Favourites dialog either by clicking on the favourites button ** Or going to. Tools, AI tools, synthetic voices, favourites on the top menu.
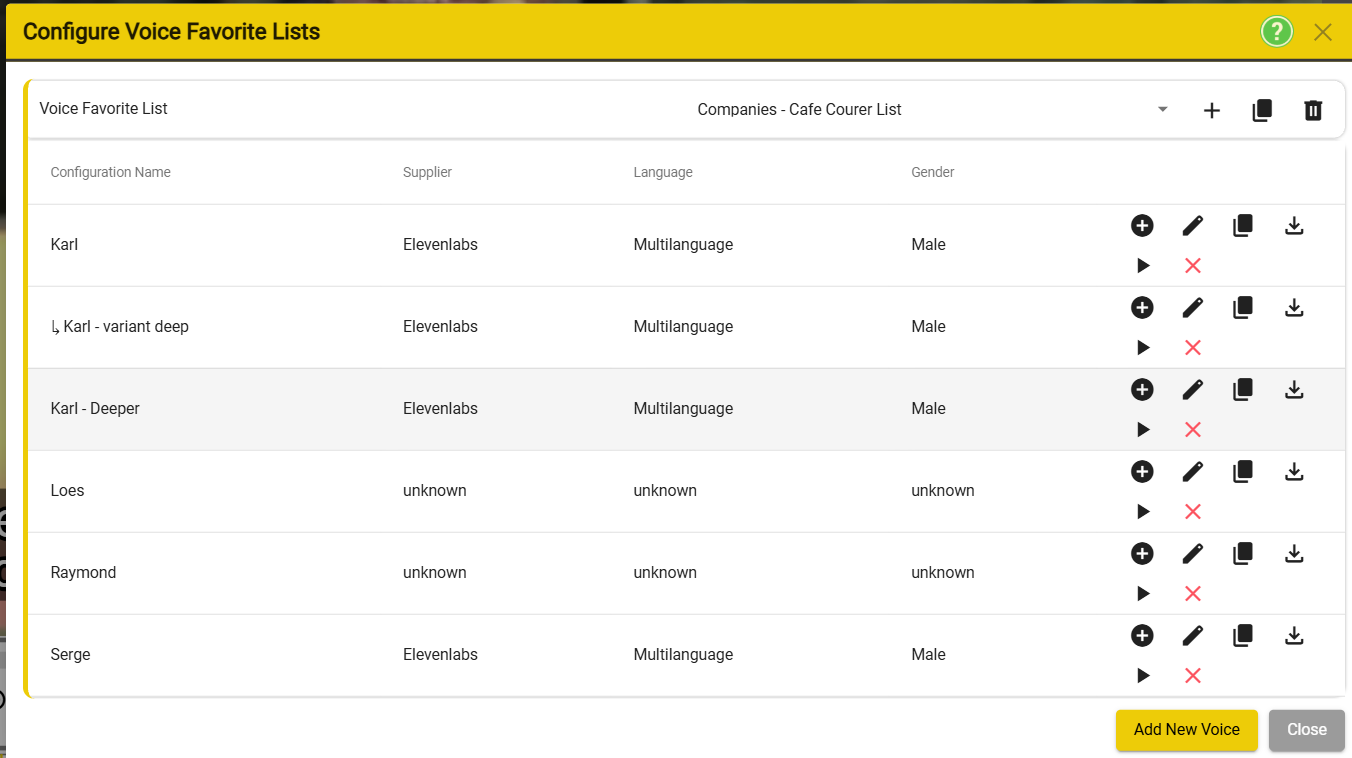
To create a new favourites list, click on the plus button on the top row. This will open the new favourites list window.

You can create either a local or a company favourites list.

**Local favourites list - **This list will only be available on your computer.
Company favourites list - This will be available to everybody in your company.
Give your new favourites list a name and click save.
Other Controls
**Delete a Favourites List **- Click on the Bin button on the top row.
Create a duplicate of the Favourites List - Click on the Duplicate button on the top row.
Adding or modifying the voices in a favourites list.
**Open the Favourites dialog either by clicking on the favourites button ** Or going to. Tools, AI tools, synthetic voices, favourites on the top menu.

Select from your available favourites lists by using the drop down on the top row. This will display all the voices currently in that favourites list.
Add a new voice - Click on the Add Voice bottom
Delete a voice - Click on the Red X next to the voice.
Edit the voice settings - Click on the pencil next to the voice.
**Duplicate the voice **- Click on the duplicate button next to the voice to create a copy of the voice in the same favourites list.
To hear the voice with the current settings - Click on the play button next to the voice.
**To create a variant of the voice **- You can make multiple variants of the same voice. Click on the plus button and edit the voice settings. EG, a version of the voice, but with a deeper pitch.
Hint: You can also add the current voice to the currently selected favourites list by using the add to favourites button.
Voice Cloning
You can clone voices directly from the program audio track. For this you will need:
- A task containing the program video and audio, the script with the Roles identified and correctly timed.
- An account with either Elevenlabs or Deepdub.
- The Account API key entered into Stellar Manage. ### Link to API Key section in Stellar manage help
Note: only Elevenlabs and Deepdub support voice cloning via Stellar Create. Respeecher support cloning but you will need to have an account and contact them to arrange for the cloning.
Important: You are responsible for all legal rights, copyrights etc. for the creation and usage of all cloned voices.
To open the voice cloning dialogue either click on the Clone Button or go to **Tools - AI tools - Synthetic Voices - Clone Voices **on the top menu.
Voice cloning works by splitting out audio segments from the programme audio. This is done for a specific role based on the timing of the text boxes in the script. It is important that the script is correctly timed and the roles correctly identified..
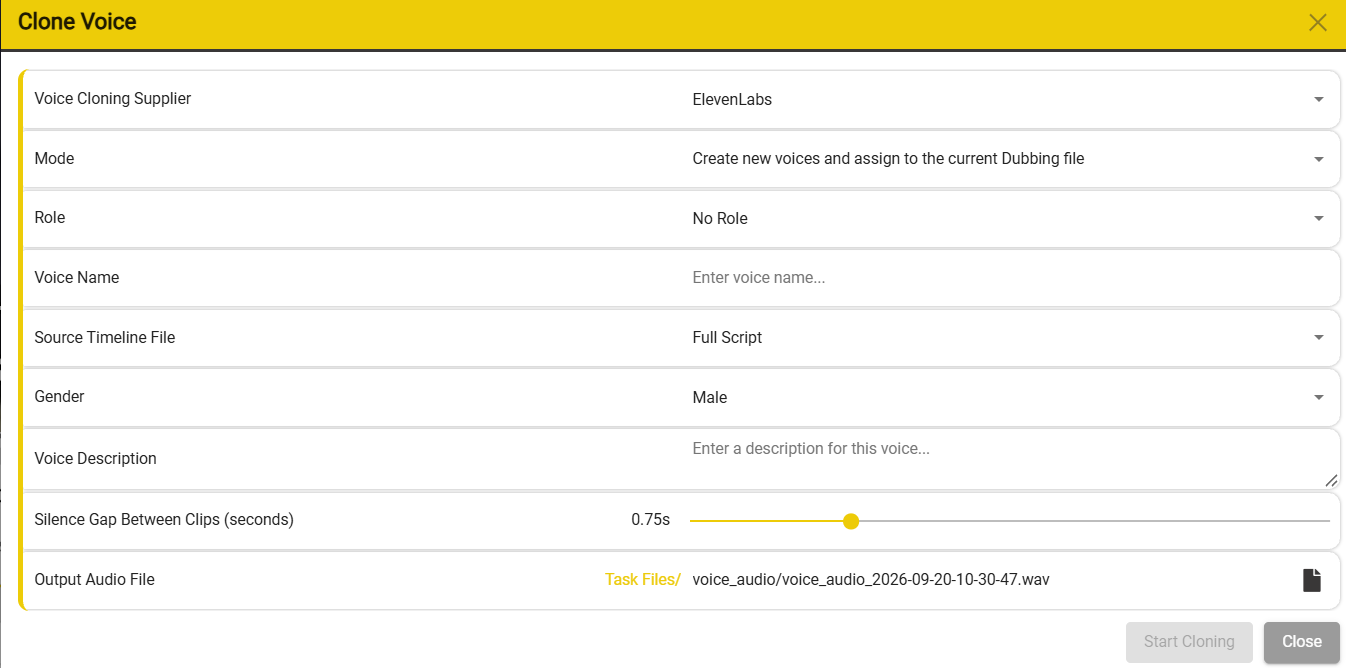
**Voice cloning supplier **- Select the supplier you want to use.
Mode -
- Create a new voice and add it to the current dubbing file.
- Just create the new voice in your account
**Role **- select which Role in the script to clone.
**Voice Name **- give the voice a name - this is the name that will show in your voice lst for the selected supplier
**Source Timeline ** - if you have more than one script loaded you need to select the correct one.
**Gender **- Optional flag that will be stored with the voice name
Voice Description - Optional description that will be stored with the voice name
Silence Gap - sets the silence gap between each audio clip in the training audio file.
**Output audio file **- locaton and name of the training audio file that will be used to create the new cloned voice
Controls
**Start Cloning **- start the audio separationa nd voice cloning process
- This may take some time
- You will need to select the new voice from the suppliers list to use it.
For more information on voice cloning see: