Audio Description Workflow - Task Manager
Introduction
The Task List System allows Tasks to be assigned to one or more users and distributed anywhere in the world.
- A Task contains all the media and subtitle or script files and audio required to do a specific task.
- Any changes to the task files (edits, additions deletions etc.) are automatically synchronized to the central store.
There are two aspects to the Audio Description Workflow with a Task System:
- The creation of a Audio Description Task
- Working on the Audio Description Task
Creating the Task
For Full details see: Stellar Manage
On the New Tasks page select one of the audio description task options.
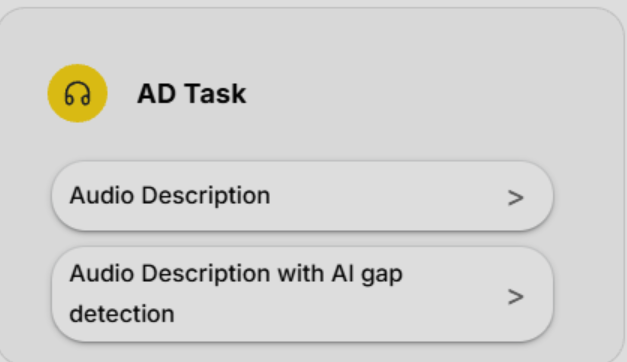
- Audio Description - create a new Task with the option to select an existing script file or create a new blank script file.
- Audio Description with AI gap detection - create a new task and use AI to create an AD script file Blank boxes for each gap in the programme dialogue.
Working on a Task
The users assigned to the Task will receive an email with information on how to start working on their task. The new task will appear on the Stellar Create dashboard.
Selecting a Task
- Either - Just click on the task in the dashboard.
- Or - Open the Tasks dialog vie the More Tasks link on the dashboard or vie the Taks menu.

This open the following window.
In the Active Tasks Tab, they will now see the new Task that was assigned to them. All the details of the task will have been received in the previous email.
Loading a Task
To load a task, left click on the download icon  .
.
Hold Shift and then left Click on the download icon to download the task and preload the associated audio files, if any.
Audio Description Layout
When you first start Stellar you will get a default Layout loaded. The layout sets how the screen looks and what controls and tools you have available. Because Stellar can be used for a wide range of work it’s important that you load a suitable layout and a number of default Layouts have been provided.
Files → Layouts → Load
This will open the Layouts Window.
Click on the Layouts Library Dropdown list.

Select System Layouts
Select AudioDescription - this will open the AudioDescription Layout list
Decide on a Layout depending on your needs.
Press the Load Button  corresponding to the the layout you want to try.
You can swap between layouts at any time and you can create your own Layouts and save them for future use.
Audio Description Layout
When you first start Stellar you will get a default Layout loaded. The layout sets how the screen looks and what controls and tools you have available. Because Stellar can be used for a wide range of work it’s important that you load a suitable layout and a number of default Layouts have been provided.
Files → Layouts → Load
This will open the Layouts Window.
Click on the Layouts Library Dropdown list.
Select System Layouts
Select Audio Description - this will open the Audio Description Layout list
Decide on a Layout depending on your needs.
Press the Load Button corresponding to the the layout you want to use.
You can swap between layouts at any time and you can create your own Layouts and save them for future use.
Working with Scripts
Importing a Script
You can add a script file to the current Task with or without a format conversion.
The new file will become part of the current Task.
You can select to import all the contents of the file, the timing information without the text or just the text without the time stamps.
In the case of AD and Dubbing files you can import with or without the associated audio files.
File → Import → Text File
This will open the Import Text File
- Source File Path - Allows you to browse to the path of the file you want to import.
- If the Source file is an AD or Dubbing file a new option will be visible:

- If selected any associated audio files will be imported
- If not selected only the script file (srtad, esf or srtad) will be imported.
- Destination File Path - Shows where the imported file will be stored. You should not change the destination file path unless you know exactly what you are doing.
- If you want to convert the file to a different type you can select between the standard Internal file types. These are the types that can be edited within Stellar.
- Subtitles – STL, SRT, PAC, FPC & IMSC-Rosetta
- Audio Description – ESF or SRTAD
- Dubbing – SRTDUB & TTAL
- NOTE: for AD and Dubbing files you MUST create a new sub folder for each file. This is to keep the audio WAV files for this Audio Job separate from other wav files for other jobs.
-
Create New Project - Check this if you want to create a new project.
-
Project Name - Allows you to set the Name of the project. If Create new project is selected.
-
Display Name - Allows you to set the Display Name, it can be different than the actual Project Name.
-
Import Mode - Allows you to select the Mode of the Import process.
- Import All – the new file contains all the text and timing information from the source file.
- Import Times Only – The new file only contains blank subtitles. This is useful for creating a blank template when translating between languages
- Import text only – the new file contains text subtitles but no times. – this is useful if a file needs to be retimed.
The new file will be added as the last column in the current Task.
- It is possible you will need to use the drop down selector in the last tab to see the new file, depending on the number of files in your Task.
Creating a Script
The first step is to create New Text file to the Task.
Files ->Text Files → New
The File Browse window will open to show all the text files in the current task . The new file name will default to the one of the Media that was previously uploaded into the Task but you can change this.
In the New Filename entry you will be able to change the name of the text file. DO NOT remove or alter the .srtdad ending in the filename.
In the File Format field, please make sure that it is set to .srtad. You can do that by using he drop down list to pick .srtad.
In the Style Profile entry, please make sure you have Voice Over Default.json or the style profile you have been told to use. To set this profile, click on the File Icon. Read more about Profiles and how to use them here.
- Then press in the area on the upper left side of the window to open the drop-down list.
- Select System Profiles
- Select Audio Description Folder → SelectAudio Description Default.json → Press OK
When you made all the required modifications, you can press on Create the create a New .srtad script file.
To insert the new file into the Task, press Save.
You should now see the new Script File present in the Timed Text Editor on the right.
Editing a Script
After creating a new Script File ( .srtad text file), one title with the incue set at first frame of the existing media will be inserted into the Task.
Moving
Moving on the timeline
Left click and drag while on the timeline

Move Frame by Frame -
Scroll wheel Up/Down
If available Scroll Wheel Tilt Left/Right - more precision in movement.
Insert
To insert a new Title
Drag the timeline to the exact point where you want the new title to start, the press Ctrl+ Enter.

Drag the timeline to the exact point where you want the new title to start, Right Click on the timeline → Insert.
Delete
To delete a Title - select the title that you want to delete (drag the cue on top of the title in the timeline), then press Ctrl+Shift+Delete → Yes

You can also delete any Title by pressing the Trash Can Icon on each Title
Trashcan → Ok
Hold Shift then Click on the Trashcan → Skip the Delete Confirmation Prompt
Right click on the Title in the Timeline - > Skip the Delete Confirmation Prompt

Reposition
Reposition / move one title on the timeline - Hover the Title, hold SHIFT and then LEFT CLICK DRAG the title.

Reposition / Recut All Titles - Hover the Title, hold CTRL + SHIFT and then LEFT CLICK DRAG the title.

Reposition / Recut titles from this point on - Hover the Title, hold ALT + SHIFT and then LEFT CLICK DRAG the title.

Reposition / Recut titles from this point on setting incue to current Time Cue - SHIFT + Double Click

Recut/ Reposition sub from this point on ALL files. - SHIFT + CTRL + Double Click

Adjust Incue/Outcue
Adjust Outcue - Hover the RIGHT end of the Title, hold ALT + SHIFT and then LEFT CLICK DRAG

Adjust Incue - Hover the LEFT end of the Title, hold ALT + SHIFT and then LEFT CLICK DRAG

Set Incue to current Time Cue - this will snap the Incue to the position of the Video Cue - Select the Title, move the Video Cue to the time where you want to set the Incue → Press Alt + Plus (near backspace)

Set Outcue to current Time Cue - this will snap the Incue to the position of the Video Cue - Select the Title, move the Video Cue to the time where you want to set the Incue → Press Alt + Minus (near backspace)
Exporting a Script as Text File
Once the Script has been created, you can export it as Text File.
Files → Export → Text File
This will open the Export Text File window.
-
Source File - Select from one of the Text Files currently in the Task. Defaults to the currently selected column
-
Source File Path - Displays the path and filename of the file being exported. – This field is read only.
-
Destination File Path - You can set the location where you want to save the exported file. To this press on the File Icon on the right side of this row. This will open the File Browse window.
Navigate to the location where you want to save the file. Since we working with AD and the export format is set to .srtad, it is advised that you first create a new folder before saving. Generally, when saving an .srtad file, the users want to have the associated audio snippets(read more at point 4) also exported. As a result, it is better to save the script in its .srtad format in an empty folder so that the script and the audio snippets are in the same place.
Selected File - You can change the name if needed. Do not delete the .srtad extension.
File Format - You can export to other file formats if required [more about file formats can be found here Supported File Formats].
Once you have made the necessary changes, you can press OK.
- Copy Audio Files - While using an AD or Dubbing format, you will have the option to export any associated audio files (if they exist):
None - No audio will be exported.


All - Will export all audio (all takes) including the inactive ones.


Active - Will export only the takes which are marked as Active.


Mixed and Trimmed - Will export only the takes which have been Mixed and Trimmed.
- Export Mode:
Times and Text – the new file contains all the text and timing information from the source file.
Times Only – The new file only contains blank subtitles. This is useful for creating a blank template when translating between languages.
Text only – the new file contains text subtitles but no times. – this is useful if a file needs to be retimed.
Once you have everything set up in the Export Text File window, you can press Export to start the process. If successful, you will see the following prompt, informing you that the export process has been successful.
You can press Open File Location to open the location where the file has been saved, or you can press OK to return to Stellar.
Exporting a Script as Excel Spreadsheet (.csv)
Files → Export → Script File
**This will create a version of the scriptfile in a simple spreadsheet format. This format is compatible with other systems and is one of the standard Netflix formats. **
This will open the Export to Spreadsheet window.
- Source File – select which file in the current Task to export as a spreadsheet.
Defaults to the current file if more than one present in the Task.
- Source file name – shows the file name of the selected file – read only.
- Destination file name – set the output file name and location.
Use the browse button to find the right folder.
- Export to CVS button – complete the output.
- A confirmation box will pop up with the option to open the output file location.
You can press Open File Location to open the location where the file has been saved, or you can press OK to return to Stellar.
Working with Audio
Once you have finished with setting up / creating your AD or Dubbing script, you can proceed to voicing the script lines.
Stellar offers three methods of voicing your script:
Record - you can record the lines yourself,
**Render **- you can use Synthetic Voices services provided by third-parties such as Amazon, Google, Microsoft or CereProc.
**Morph Voice **- you can record yourself and then transform or morph your voice into sounding like the selected synthetic voice.
You can only use voice morphing with specific voices from certain suppliers

Recording Takes
To record a script line:
In the timeline, double-click on the line that you want to record - this will position the cue head at the start of that title.
Press the Record Button  - this will was start the recording process. The cue head will move to a few seconds before the currently selected line and Stellar will start to record.
Once you have stopped speaking, Stellar will automatically stop the recording. Best results are achieved in a quiet recording space. Once the recording has stopped, Stellar will autotrimm the silene at the end of the recording.

!!! If Stellar has trimmed a bit more than it should have (should not occur if the microphone has been correctly set up), you can simply untrimm that part.
Hold SHIFT → Hover over the right end of the waveform → Drag the end towards the right to uncover more of the recording. !!!

Synthetic Voicing
Before rendering a script line, you will have to choose one of the voices that are available from our third-party providers. For more information about this process, please check the Synthetic Voices Tutorial.
To render a script line, select the line, make sure you have selected render mode, and then press Render Title  button on the Media Controls Widget.
A render voice status window will appear.
The rendered audio track will appear bellow the corresponding script line.
To hear the rendered title:
- Double click on the audio wave form.
- Hover over the audio wave form then press play/stop to play/stop the audio.
You can record as many times as you want, these Takes are always stored and can be seen below the text box on the timeline.
You may need to expand the timeline to see all Takes See: Multiple Takes
Voice Morphing
Voice morphing combines recording from your microphone and synthetic voice generation.
- Make sure you have the synthetic voice controls visible and you have selected a voice that supports voice morphing.
- Most ElevenLabs and Respeecher chart voices
- Select Morph Voice on the record control.
- Record in the normal way and once you finish the voice will be morphed into the selected voice.
---
Editing Takes
Repositioning only the Audio Take - SHIFT + Dragging on the Waveform

Repositioning the Title - SHIFT + Dragging on the Title. Moving the title will automatically move the audio with it.

Audio Editing in Stellar is Non-destructive, this means that if you trimmed an audio, you can also untrimm it.
Trim the start of the Audio - SHIFT + Dragging [left side of the audio]
 |
|
Trim the end of the Audio - SHIFT + Dragging [right side of the audio]

Deleting a Take
Right-click on take → Delete
Or
Hover over take → Trash Icon → Yes

Trim Take Right-click on take → Trim Take
Click to Expand
- Remove Trim – set the audio length to the full extent of the recorded clip.
- Auto Trim – use the stored Silence level and silence guard setting to automatically trim the clip.
-
note
-
You can use the Scissors button on the Take waveform (hover over the waveform) to do an Auto Trim.
- Trim to Title – Trim the audio to match the text box length – Warning- this may clip off recorded speech.
- Set Trim Start – calculate the correct trim for the start of the Take – This option is only visible if the media time makes the action possible.
- Set Trim End – calculate the correct trim for the end of the Take – This option is only visible if the media time makes the action possible.
Duplicate a Take - Create a copy of an existing take. Duplicate will be inserted bellow the original.
Righ-click → Duplicate Take

Conform Take – Create a new audio Take by trimming and mixing all current, unmuted, takes
Useful if you have used multiple sub recordings to achieve the result you want.
For example when recording the AD for long film credits.

Split Take - Right Click → Split Take
Splits the audio take into two based on where the cue head is placed.

Multiple Takes
Stellar allows you to record multiple takes from which you can choose at a later date.
To record more than one take, you first have to disable the existing recording.
To disable a recording, hover over the waveform of the recording and then left click on the speaker icon; or right-click on waveform to bring up the context menu → Disable

The take will be greyed out and moved one row lower.
If you do not see the greyed out take, you will have to make the row on which it was moved visible. To do this, in the left side of the timeline, press on this icon  .
.

To add a take, you just have to press REC and record normally, or use a Synthetic Voice to generate a new track. This track will appear one row above the inactive take.
To switch between tracks, just mark them muted/unmuted by hovering and then pressing the speaker icon; or or right-click on them to bring up the context menu → Mute Take

To record another take, make sure that all the existing takes are marked as inactive then proceed as normal.
! If you can hear an echo, than most likely you have two takes that have been marked active.
! If you do not hear any of the takes, then it might be the case that all of them were marked inactive.
Editing Fades
Each audio clip in a AD file has an associated fade setting, this controls how much, and when, the program audio will be faded down during the AD audio.
A close look at the Fade Handle UI controls.
Click to Expand

Each fade contains 4 handles:
a - start marker
d - end marker
b - fade in end marker
c - fade out start maker
Moving the Markers - the markers can be moved by holding Shift and Left Click Dragging them
There are two types of movement that can be done with a selected marker.

Up - Increases the Volume
Down - Decreases the Volume
Left - Reduces the length of the fade
Right - Increases the length of the fade
Setting the start of the fade interval - move the a handle (start marker) left or right
Setting the end of the fade interval - move the d handle (end marker) left or right
Setting the end of the fade in interval - move the b handle (fade in end marker) right or left
Setting the start of the fade out interval - move the c handle (fade out start marker) right or left
Set the volume maximum point of the fade in interval - move the b handle (fade in end marker) up and down
Set the volume maximum point of the fade out interval - move the c handle (fade out start marker) up and down
Exporting Job
There are several options of exporting the work that you have done in Stellar:
Stellar Project - This will create a zip that can be sent and opened by other users of Stellar.
Audio Mix - offers you the option of exporting to various outputs/formats such as Premixed Wav, Premixed Video, Mono Wav etc.
Audio Job - A zip file which contains the script file (srtad, esf or srtdub) and any associated audio files (wav) combined in a single Zip file.
Pro Tools File - A Pro Tools Project consists of the audio files (wav) and associated metadata combined in a single .ptx file. This is the best method of exporting audio and timing information from Stellar to Pro Tools.