Stellar Manage User Portal
The User Portal is where you manage the tasks you've been added or assigned to. From here you can review task details, upload and download files, update the workflow step of a task, and delete asset files directly without using Stellar Create.
This guide walks through the core actions available in the User Portal:
-
Working with task files
-
Changing the workflow step
-
Filtering the task list
-
Customising which columns are displayed.
Working with Task Assets
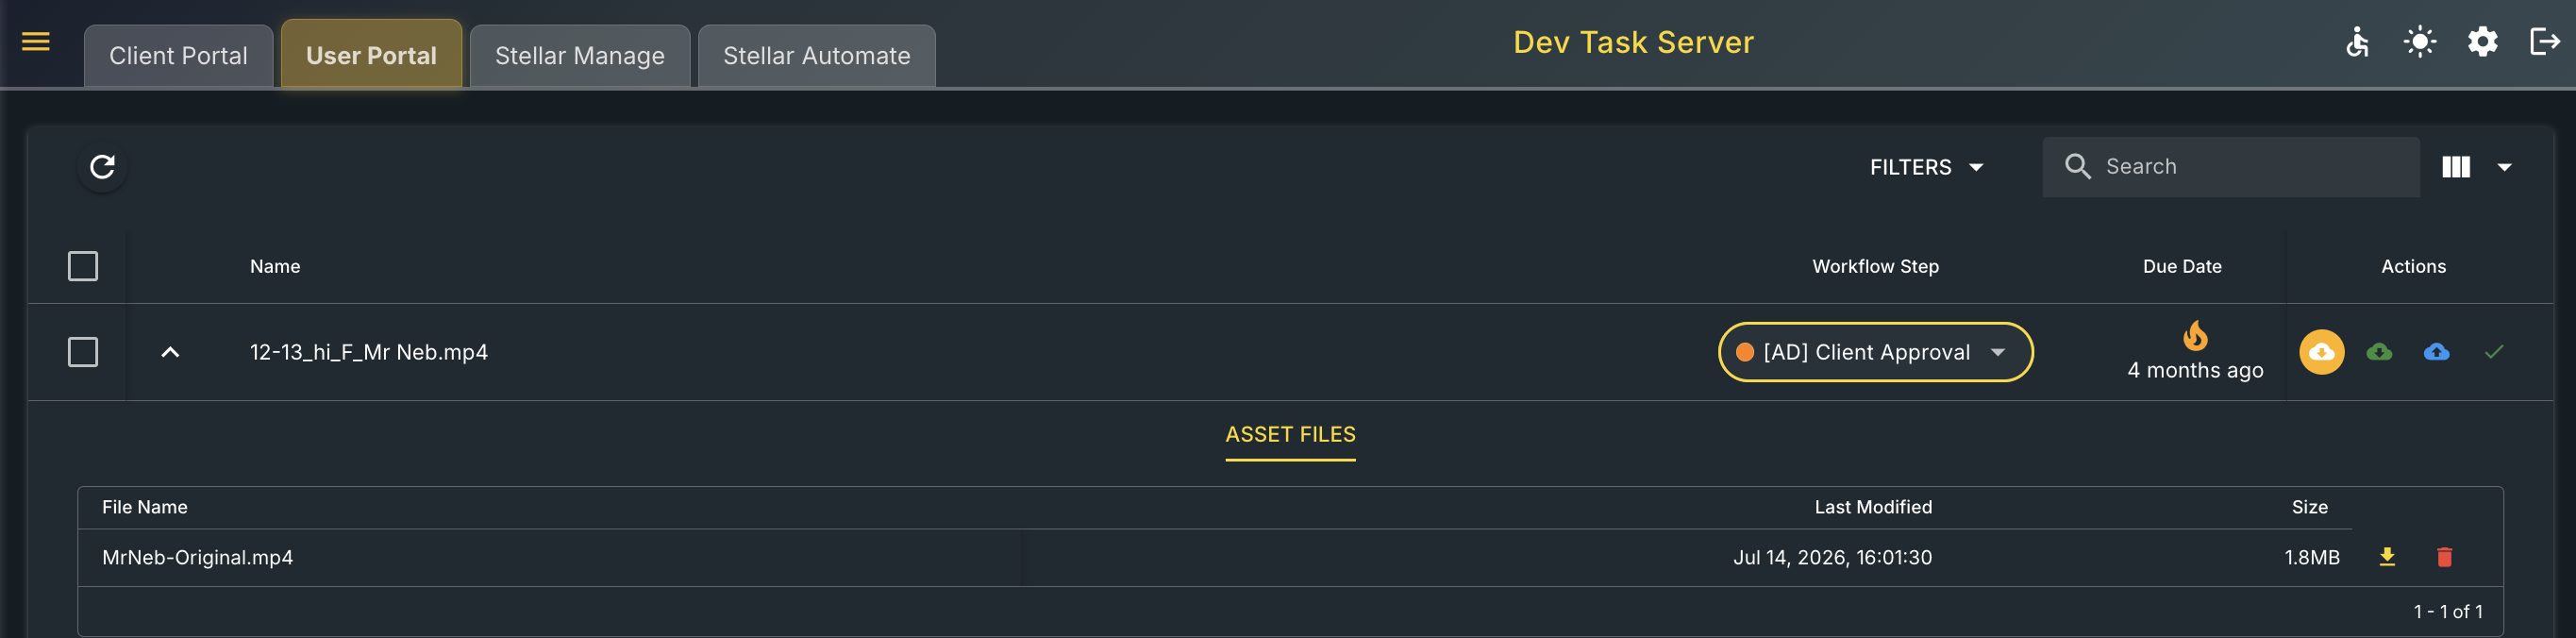
Each task can have one or more asset files attached to it. These are listed in the Asset Files section, which appears when a task row is expanded.
Opening a Task
If you have Stellar Create loaded on your computer, you can open it in Stellar Create.
In the Actions column, select the highlighted cloud icon 
This opens the task in Stellar Create. This is useful when you only need to review and make changes to the file without saving a copy on your device.
If you don't have Stellar Create on your computer, you can download and upload files instead. This allows you to work in other tools and upload the finished results back into the Stellar Manage system.
Downloading assets
You can download files from a Task:
- In the Actions column, select the download icon

- To download a specific asset file, go to the Asset Files section and select the download icon next to the file you want (shown in the Size area of the file row).
Uploading assets
To add a file to a task:
- From the task list, locate the task you want to add a file to.
- In the Actions column, select the upload icon

- Choose the file you want to attach from your device.
The uploaded file will then appear in the Asset Files section for that task.
Downloading assets
You can download files at either the task level or the individual asset level:
- In the Actions column, select the download icon

- To download a specific asset file, go to the Asset Files section and select the download icon next to the file you want (shown in the Size area of the file row).
Deleting assets
To remove a file from a task:
- Go to the Asset Files section for the relevant task.
- Select the bin/trash icon
 next to the file you want to remove.
Deleting an asset file is permanent, so make sure you no longer need the file before removing it.
Changing the Workflow Step
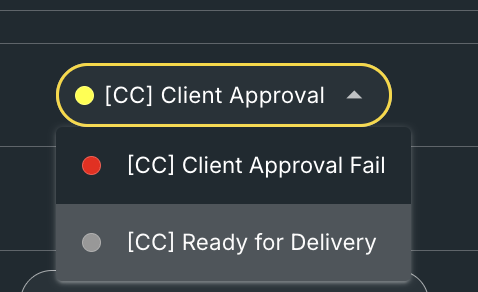
The Workflow Step shows where a task currently sits in its process — for example, awaiting approval, ready for delivery, or failed approval. The coloured dot next to the step is a configurable highlight.
How to change the workflow step
- From the task list, find the Workflow Step column for the task you want to update.
- Select the current workflow step to open the dropdown.
- Choose the next step from the available options.
The task will update to reflect the newly selected workflow step.
The list of workflow steps you can choose from depends on the task's configured workflow.
You may also only see steps that you have permission to select.
Once you change the workflow step, it may disappear from your list.
Filtering Tasks
Use the Filters panel to narrow down the task list and quickly find the tasks you're looking for. Select Filters above the task list to expand the available filter options.

The following filters are available:
- Workflow – Filter tasks by the workflow they belong to (Audio Description, Subtitling, etc.)
- Workflow Step – Filter tasks by their current step within the workflow.
- Owner – Filter tasks by the user who owns the task.
- Media – Filter tasks by the type of media associated with them.
- Assigned Users – Filter tasks by the individual users assigned to them.
- Assigned User Groups – Filter tasks based on the created user groups.
- Project ID – Filter tasks belonging to a specific project.
- Client – Filter tasks by the associated client.
- Tutorial – Filter tasks based on their tutorial setting.
- Tags – Filter tasks by tags applied to them.
- Language Tags – Filter tasks by their associated language tag(s).
You can combine multiple filters to refine your task list further.
Customising Task List Columns
You can choose which columns appear in your task list so that you only see the information you need.
How to select columns
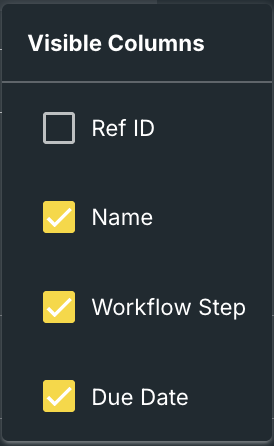
- Above the task list, select the columns icon to open the Visible Columns panel.
- Tick or untick the checkbox next to each column name to show or hide it in the task list.
Available columns
- Ref ID – The unique reference identifier for the task.
- Name – The name of the task or associated file.
- Workflow Step – The task's current step within its workflow.
- Due Date – The date the task is due.
Your column selections are applied to the task list view, making it easier to scan for the information most relevant to your work.