Stellar Manage
Stellar Manage
The Stellar Manage Interface allows users of Manager level or above to manage a company resources. (Link directs to the Yella Public Task Server, if you have your own task server, then you should use the link provided by your company.
Creating a New Task
You can create a new task by pressing the NEW TASK button. 
This will open the Create Task window.
First select the type of task you would like to create.
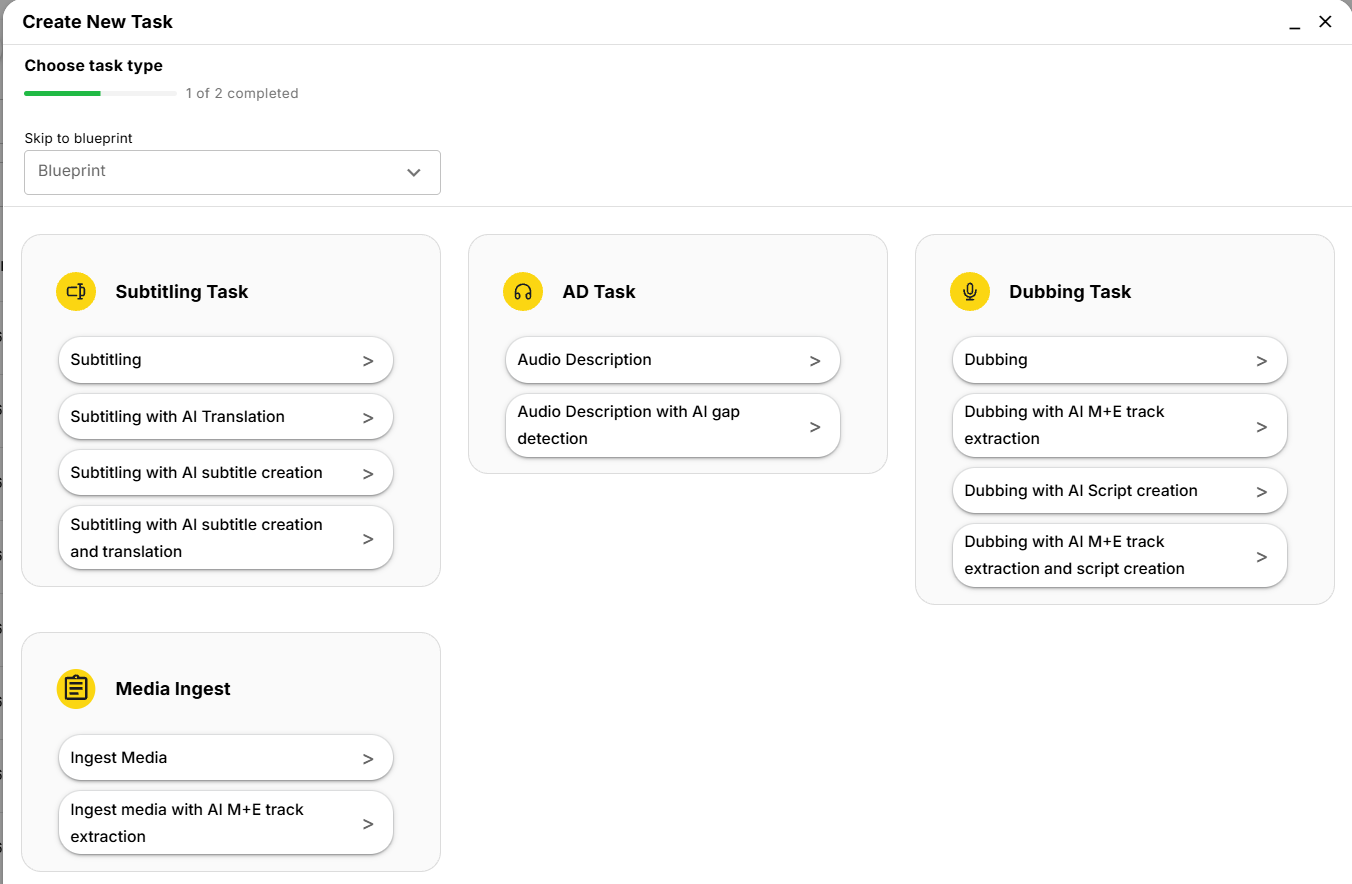
For example: create a new task and also create a new subtitle file using AI speech-to-text.

This will open a dialogue with the settings based on your selection.
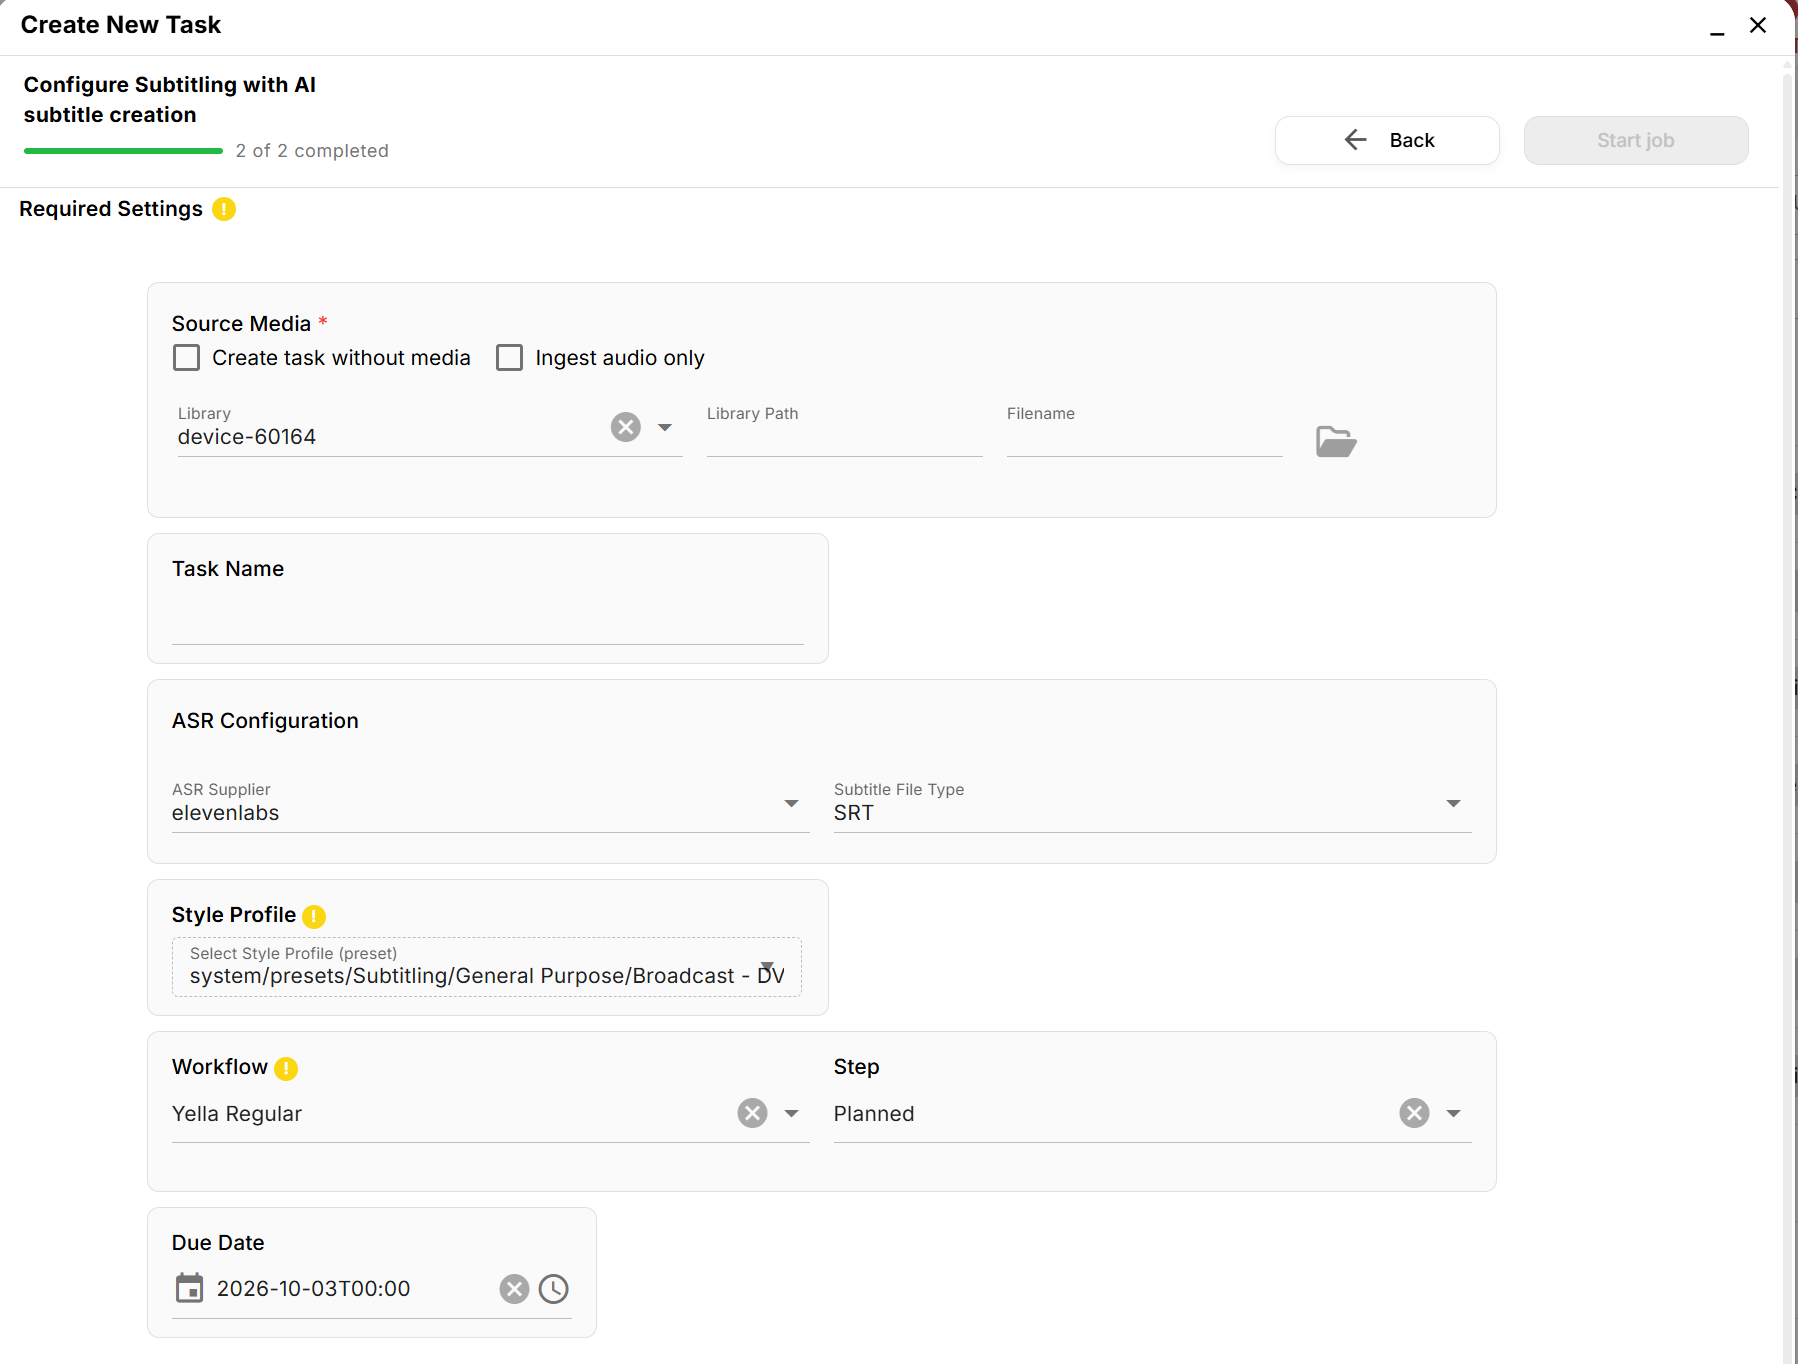
By default the library will be files on your local computer. This is normally set to be your downloads folder but that can be changed in the Settings -> More Settings menu in Stellar Create.
Click on the Browse button to find your media file.  This can be a video or an audio file in almost any format.
By default the library will be the files on your local computer (Local Library) but other libraries may be available for other file storage areas. This will depend on how the system is being set up for your company.
Click on the down arrow next to Libraries to see all available libraries. Ones currently accessible will have a green dot.
Other Settings:
Task name - will default to the file name of the media file but can be changed.
ASR supplier - select which ASR service you would like to use for the speech-to-text.
Subtitle file type - select what file type you need to created.
Style profile - a style profile sets the formatting of the subtitle file: characters per row, maximum number of rows, minimum gaps, etc.
- Select from one of the many system-style profiles or you can create your own company-style profiles.
Workflow and step - sets which workflow will be used for the task and the initial step.
Due date - Set the due date for this task.
Advanced settings:
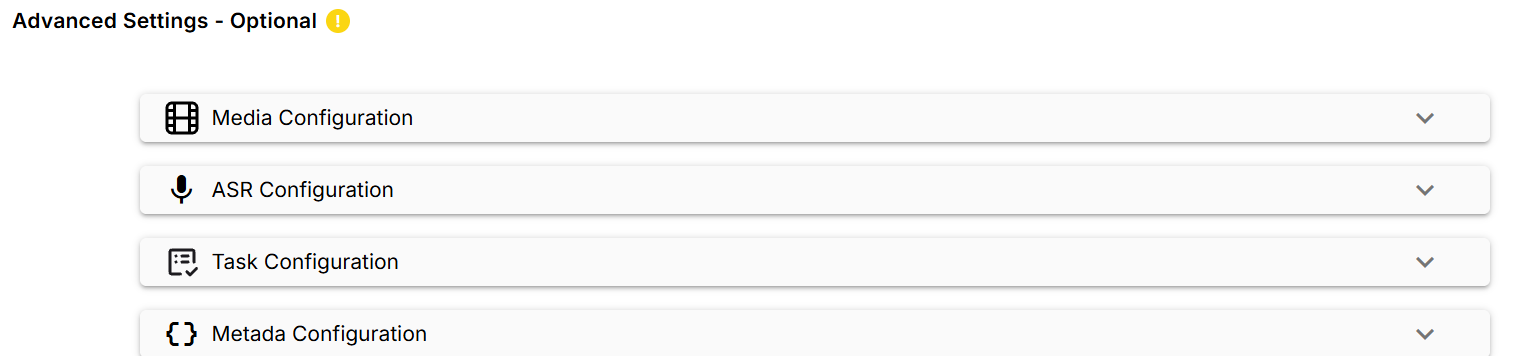
For each type of task creation there will be a different set of advanced options. Open each of these if you want to make more detailed changes to the configurations but normally the defaults will be adequate.
Once you are happy with the settings click on the Start Job button.

The task will now be created automatically in the background. IMPORTANT if this is running only on your local computer, it's important you do not stop or sleep your computer while the process is running in the background.
You will get a confirmation dialogue to show that the job has started.
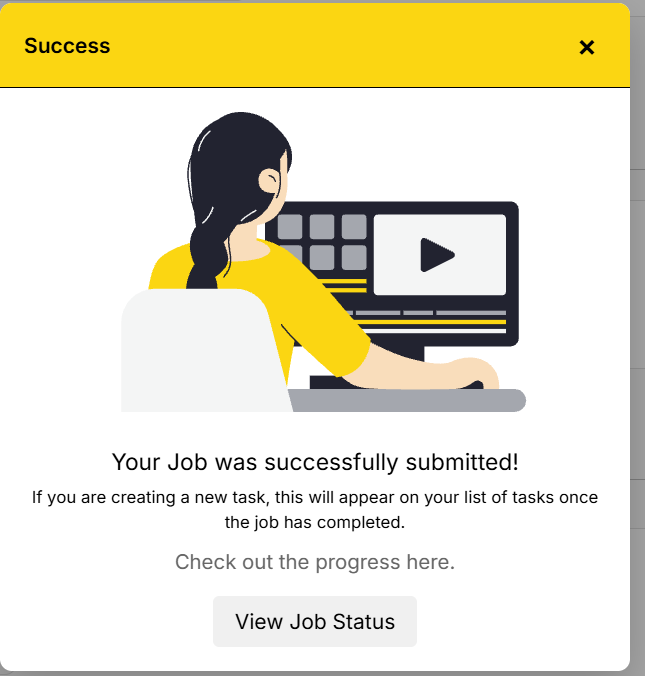
Click on View Job Status if you want to see progress in more detail.
This will open the Job Progress tab in Stellar Automate and your new job will be at the top of the list.

Once it is completed the new task will appear in Stellar Manage and on your dashboard in Stellar Create. You may need to push the refresh button to get an updated list.
Managing Tasks
The tasks tab will offer you an overview of the existent tasks on the server.
Task Information
By Clicking on the  button, you can expand the task details section. You can collapse the details section by pressing on the
  button.
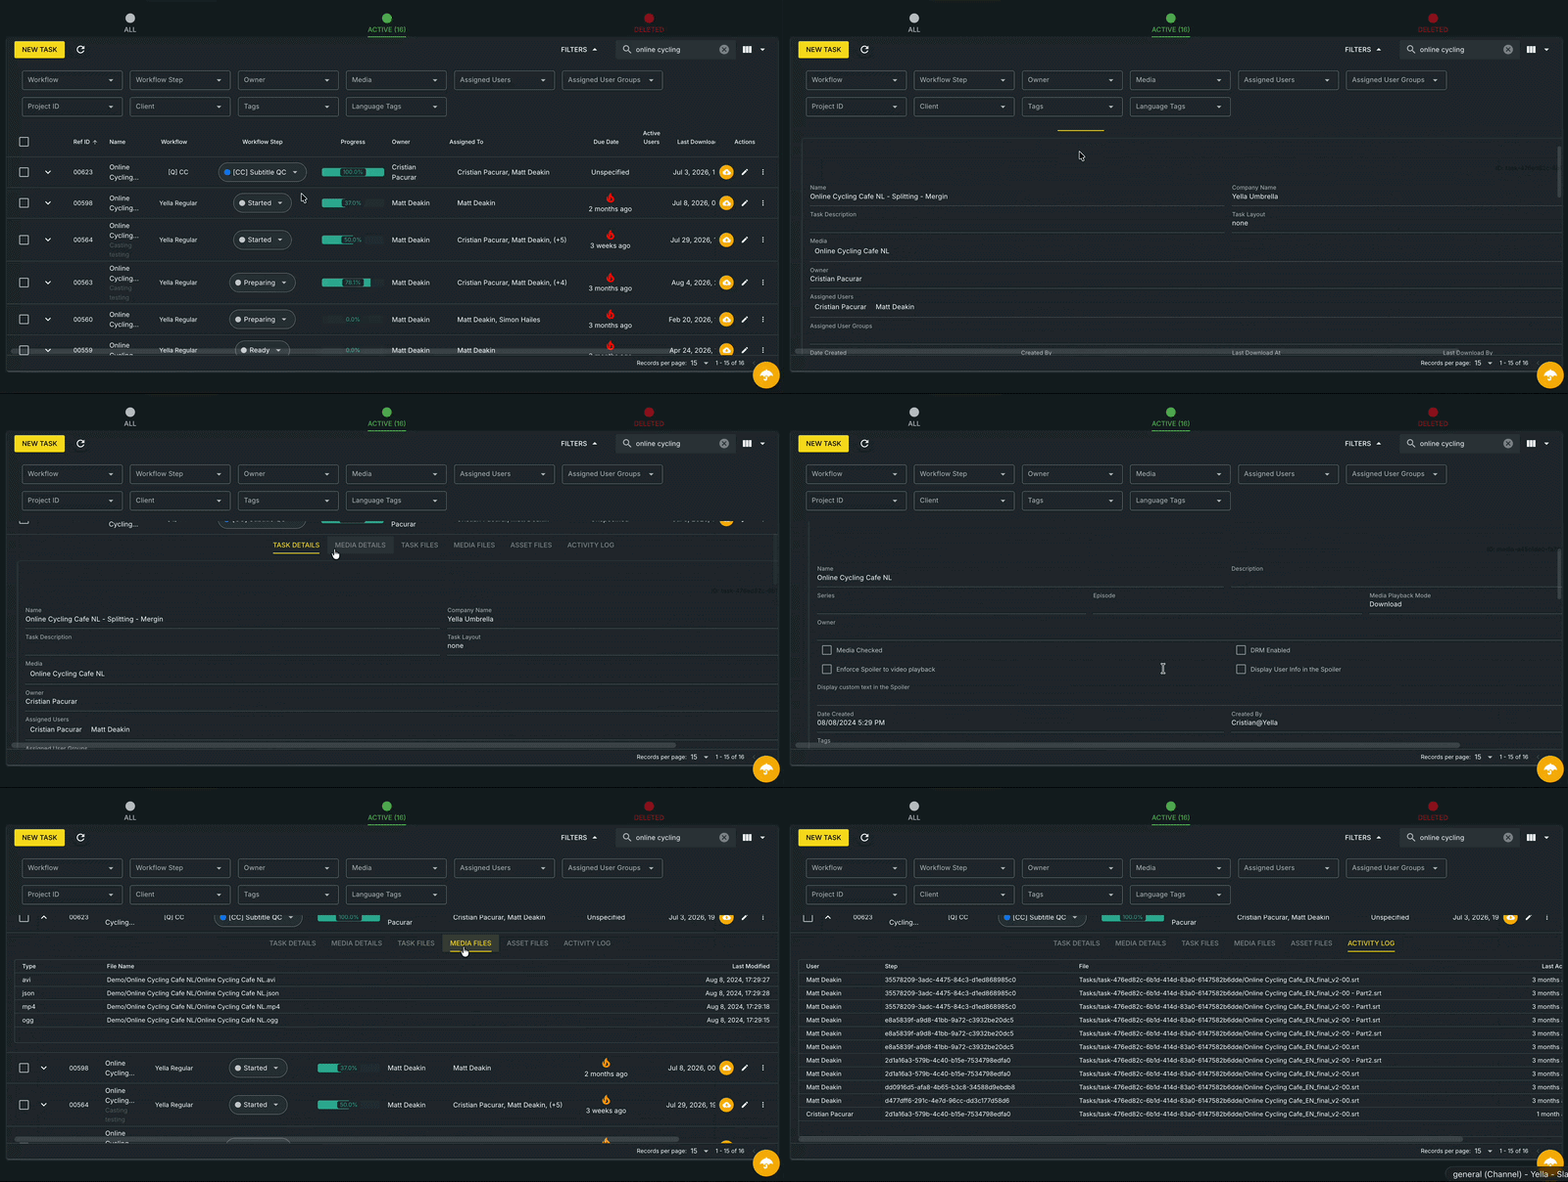
Task Details
- Ref ID - Unique ID
- Task ID - The Task ID associated to the task in the backend.
- Name - Name of the task
- Description - Description of the task
- Task Status - Select one of the exiting Status based on your requirements.
- Due Date - Select a deadline for when the task should be finished.
- Task Layout - Select and assign a layout for the task.
- Media - Select a piece of media from the existent entries in the Task Server.
- Owner - Assign the owner of the task.
- Assigned Users - Select the users which will have access to the task.
- Assigned User Groups - Select the group of users which will have access to the task.
- Tags - Input/Select tags which will be associated with the task.
- Language Tags - Input/Select the language tags which will be associated with the task.
- Notes - Add any noted or comments for the task.
Media Details
You can view the details of the media associated with the Task.
- Ref ID - Unique ID
- Media ID - The Media ID associated to the media in the backend.
- Name - Name of the media
- Description - Description of the media
- Series - Series
- Episode - Episode
- Media Playback Mode - Either Download of Stream
- Owner - Assign the owner of the media
- Media Checked - Media has been checked
- DRM Enable - Media DRM status
- Enforce Spoiler to video playback - Playback spoiler status
- Display custom text in the spoiler - Text to be displayed in the spoiler if active
- Date Created - Date of creation of the media entry
- Created By - User account which created the media entry
- Tags - Input/Select tags which will be associated with the task.
- Language Tags - Input/Select the language tags which will be associated with the task.
- Notes - Add any noted or comments for the task.
Task Files
List of text files associated with the Task
Media Files
List of media files associated with the Task
Activity Log
Logs of activities performed on the Task
Task Filters

| Filter | — | Options |
|---|---|---|
| Workflow | — | Search based on the Workflow name |
| Workflow Step | — | Planned, Preparing, Ready, Started, Completed, Checked, Approved, Delivered, Cancelled, Deleted |
| Owner | — | The list will populated with the Users which have been invited to your Task Server |
| Assigned Users | — | The list will populated with the available Users |
| Media | — | Filter based on the name of media file |
| Assigned User Groups | — | The list will populated with the available User Groups |
| Project ID | — | Search based on the unique ID of each project |
| Client | — | Filter tasks assigned to clients |
| Tags | — | The list will populated with existing tags. |
| Language Tags | — | Filter tasks based on list of language tasks DE, EN, ES, FR, IT, RU |
Sorting
| Sort by | — | Options |
|---|---|---|
| Task Name | — | By Task Name |
| Ref ID | — | Each Task has a Unique ID |
| Workflow | — | By Workflow Name |
| Media Checked | — | Checked Status |
| Owner | — | By Owner |
| Due Date | — | Sort based on when the task is due |
| Active Users | — | By which tasks have active users |
| Last Downloaded At | — | Sort by the time when the task was last downloaded |
Update
To update a task you can use the pencil button corresponding to the task that you want to update.
Workflow Step
You can change the workflow step from this UI by pressing on the Workflow Step drop down associated with your task.
Active Users
You can see the active users on a a task by hovering the green Activity Icon

Media
Media files are video or audio files stored on the Task Server. Each media file can be used in one or more tasks.
| Filter | — | Options |
|---|---|---|
| Created At | — | Creation Date |
| UiD | — | Each Task has a Unique ID |
| Name | — | Name |
| Owner | — | The list will populated with the Users which have been invited to your Task Server |
| Tags | — | The list will populated with existing tags. |
Update Media
To update the details about a media entry you can use the pencil button corresponding to the task that you want to update.

Create a Task from Media
To create a task from media that has already been ingested, press the three dots icon and the select Create Task.
Delete Media
To delete media, click on the Red Trash Can icon
Tags
The tagging system helps with managing several of the entities available in Stellar Automate: Tasks, Media, Users and User Groups
General Tags
General tags can be created by pressing the New Tag button in the General Tags section.
You can limit the usage of the tags by selecting the Excluded Entities.
Language Tags
General tags can be created by pressing the New Tag button in the Language Tags section.
Workflows and Steps
This section allows you to build your own workflows by chaining steps together.
Default Workflow
Yella Regular workflow is assigned by default to all created tasks.
Steps
Steps are the basic building blocks for Workflows.
You can create a new Step by click on the New Step Type button in the Step Types section.
Give the step a name and specify in which Tab Group the task will appear when set to that step.
Workflows
To create a new Workflow, click on the New Workflow button in the Workflows section.
You can give it a name and a description.
Add one of the steps that you have already defined in the Step Types section by pressing the Add Step button.
Define the Step Details and then click Create
| Icon | - | Description |
|---|---|---|
| Eye Icon | - | Preview the Workflow |
| Files Icon | - | Duplicate the Workflow |
| Pencil Icon | - | Edit the Workflow |
| Trashcan | - | Delete the Workflow |
Defining and creating new workflows is a complex task. It involves understanding exactly how your workflows operate and how this can be interpreted in a Stellar workflow. Please contact sales@yellowumbrella.tv for more information.
Managing users
You can manage users by accessing the User tab in the left side sidebar.
Adding a new user
You can add a new user by pressing the New User button 
This will open the Create User window. Please fill in the required fields and then press
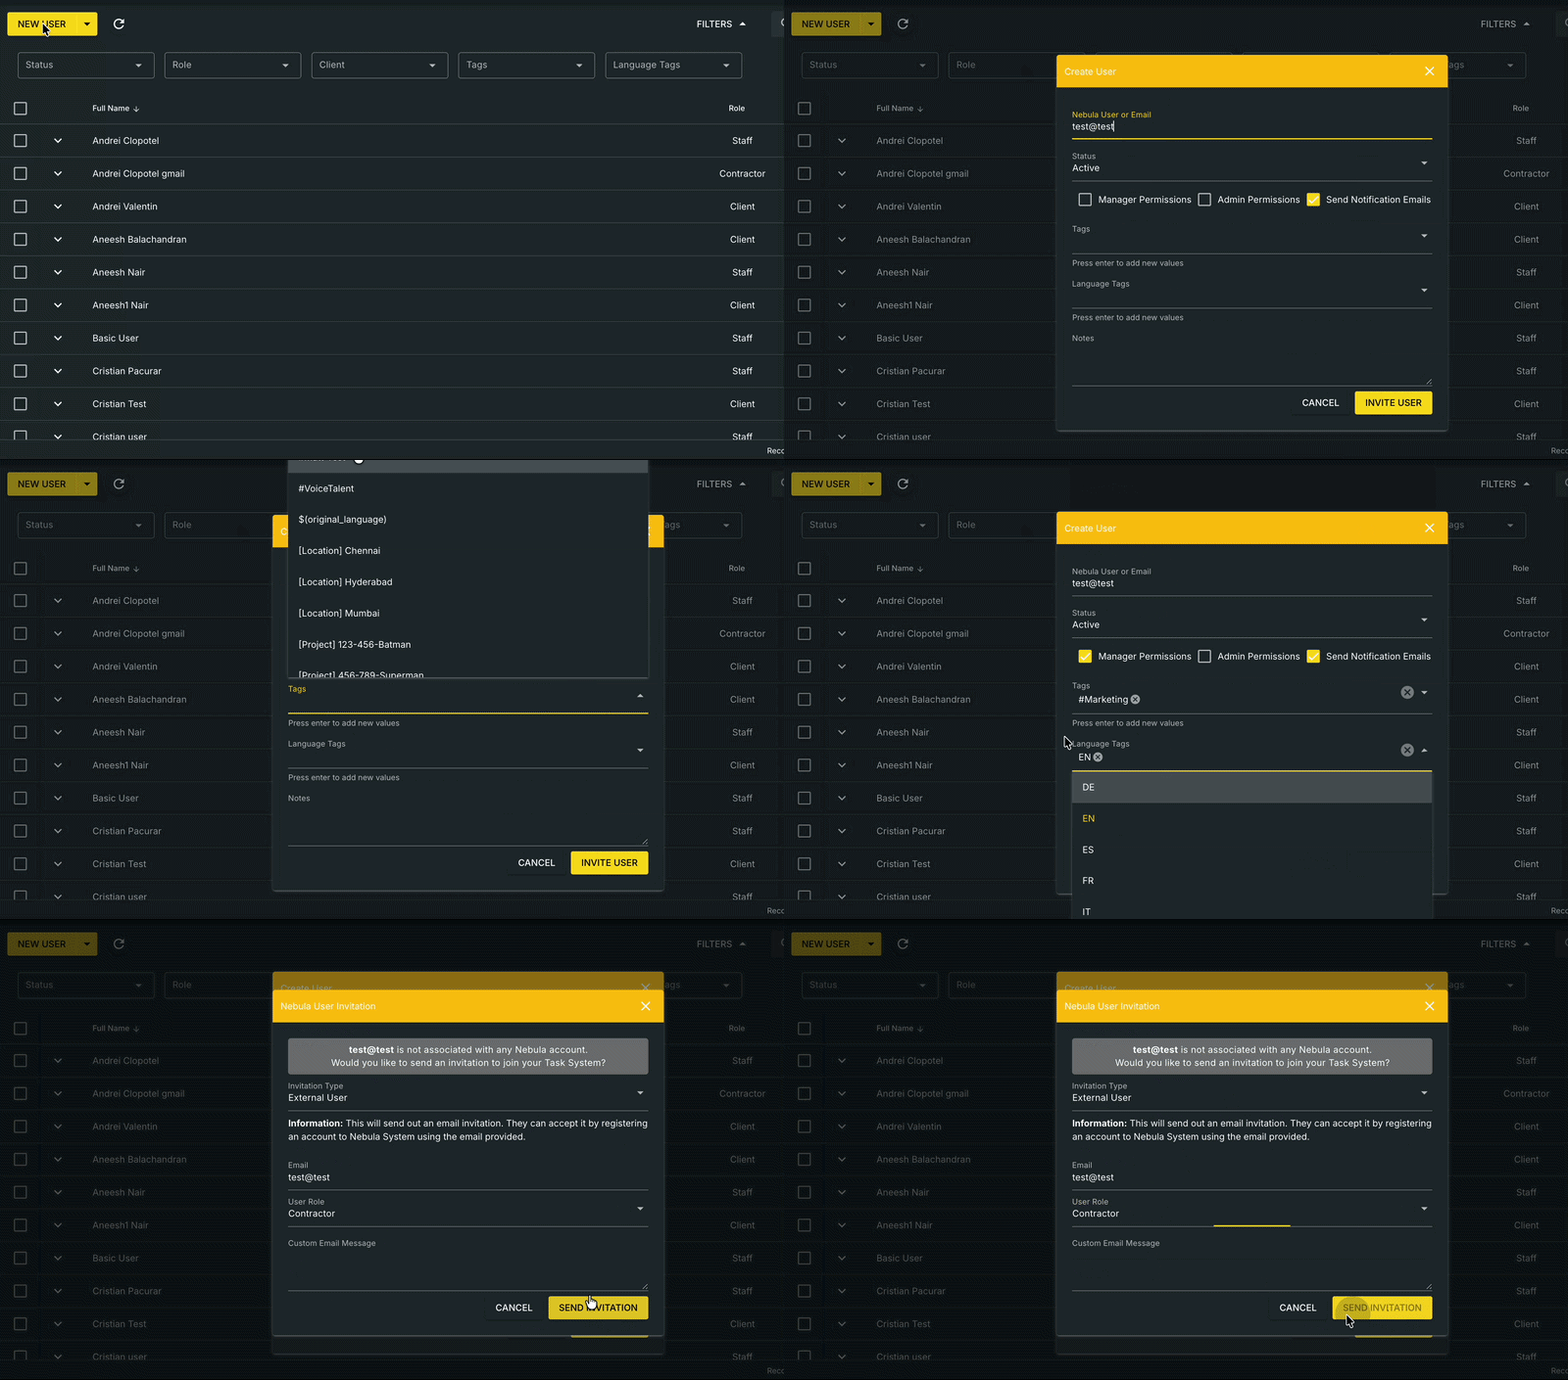
If the user already has a Nebula account, they will be invited to your Task Server as an external [contractor/freelancer] user.
If the email is not associated with any Nebula account, then you will see the following pop-up window:
This window will allow you to select the type of user that you want to create:
- **External User **[Contractor/Freelancer or Client] - They can accept the invitation by registering an account to Nebula System using the email provided here. They will not be part of your company.
- Contractor - a contractor or freelancer has their own account in Nebula and can do work for you but will pay for their own usage of the software.
- Client - a client is a special case type of user. Clients can upload. approve and download files via the Client Portal. See - Client Portal
- Internal User** [Staff ] **- They will be added directly to your Nebula company account.
Once you have filled in the required fields, please press on the  button.
Adding multiple users
It’s possible to add users in bulk using the Add multiple new Users options.
There are 3 ways of adding multiple users.
- Pasting a list of emails - comma, newline or semicolon separate

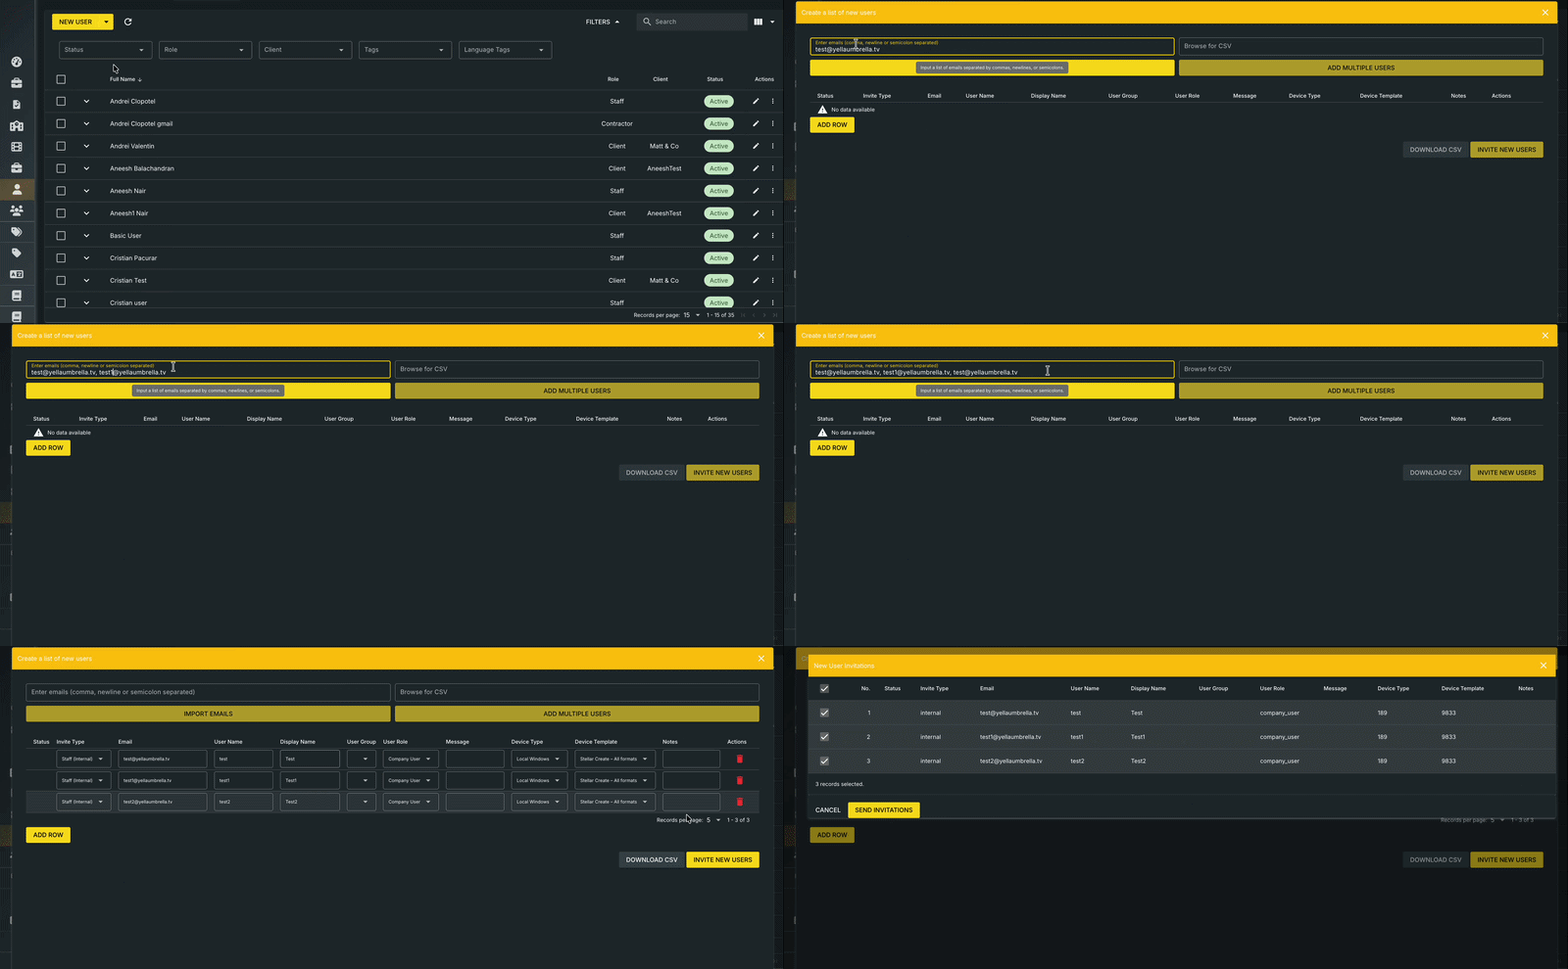
Press Import Emails to import your emails into the user creation table.
- CSV import
Browse for your CSV
Your CSV should look like this
"Invite Type","Email","User Name","Display Name","User Group","User Role","Message","Device Type","Device Template","Notes"


"internal","test.user@yellaumbrella.tv","test.user","Test User","","company_user","","189","9833",""


"internal","test2@yellaumbrella.tv","test2","Test2","","company_user","","189","9833",""
- CSV structure
| Invite Type | User Name | Display Name | User Group | User Role | Message | Device Type | Device Template | Notes | |
|---|---|---|---|---|---|---|---|---|---|
| internal | email@youremail.com | test.user | Test User | company_user | 189 | 9833 | |||
| internal | email2@youremail.com | test2 | Test2 | company_user | 189 | 9833 |
You will be able to change any of these from the UI editor in the next step.
Manually adding entries to the List of Users
Use the Add Row button to add a new user entry in the list.
Fill in each of the fields with the required information.
Sending the invite
Once you have your table with users that have to be invited/created, press on the Invite New Users button.
You will get the chance to address any issues. When you are happy with your list, you can press Send Invitation.
- Error - hover over the error message in order to see more details.
- Pending - the user is being created.
- Success - the user has been created.
Editing a User
You can edit a user by clicking on the pencil button corresponding to their name.

The Update User window will open and you will be able to edit everything related to that user except the email address which is read only.
Press the  to save your changes.
Deleting a User
To delete a user, please click on the three dots icon corresponding to their name and then on the Trash Can Icon.
You will be prompted to accept or cancel the deletion action.