Timing Tools Widget
Timing Tools.
The timing tool widget add a range of features to help you adjust the timing of subtitles and scripts.
Intervals
Tools → Timing Tools → Intervals
Or
**Click on the three dots at the top of a text column and select Timong Tools **→ Intervals.
The intervals option allows you to adjust the minimum gaps between subtitles for a whole file. Optionally you can take into account shot changes alignment as well.
- Track - Allows you to select which track (Text file) you want to adjust the timing on. Defaults to the currently selected track.
- Default Interval - Use the slider to set the default intervals(gap) between subtitles and the shot changes*
- Max Interval to apply changes - Use the slider to set the time below which changes will be applied in frames.*
- EG – Only adjust Gaps that are smaller than 12 frames, any larger gaps are unchanged
- Enable Shot change processing - enable the adjustment of times in relation to shot changes. Default setting is Off/Unchecked
- Shot Proximity - Use the slider to set the range either side of a shot change where any changes should be applied*
- In cues and out cues that are further than the shot change will not be changed
- Before Shot Interval - Use the slider to set the out cues on any subtitles to be this number of frames before the shot change*
- After Shot Interval - Use the slider to set the in cues on any subtitles to be this number of frames after the shot change*
- Apply - Save and apply the changes
- Close - Close the window without saving
- Help - Opens the corresponding help page.
*Once you have selected a slider you can use the up and down arrow buttons to adjust the setting.
Align
Tools → Timing Tools → Align or Right click in the Timeline and select Align
Or
Click on the three dots at the top of a text column and select Timong Tools → Align.
The Align control helps you line up the subtitle or script file with the video if the timecodes are different.
This is done by setting the Offset1 values for a text file using a reference title and the Current Video Timecode as a guide.
Normally, Offset1 and Offset2 for a text file should be identical to those of the video itself, so only modify using this dialog if you are sure you know what you are doing.
Offset2 normally represents the 'Slate' (the time before the first frame of Active Video)
This operation will NOT change the subtitle file in any way - it will only change the relationship between the display timing of the text file and the video timing - i.e. how it is displayed in Stellar relative to the video timecode.
Basic operation:
- Select the subtitle to be used as a reference.
- Move the video to where you want that title to appear.
- Double check the numbers, then click Set
- If you believe the subtitle file timecodes should match the video timecodes, click Default to Video Offsets
The Jump Video to In Time of Current Subtitle hotkey is very useful here
- Track - Allows you to select which track you want to offset
- Reference Subtitle - Allows you to select which Subtitle will be used as reference.
- If the File has a Subtitle Zero then select Subtitle 1
- Video Timecode to match to Reference Title incue of [Value of the Reference Title Incue] - Timestamp of the video cursor. [ changes when the timeline is being dragged]
- Offset 1 - Current Video Offset1 is [Offset1 Value] - Offset calculated based on how far the video cursor has moved from the [Value of the Reference Title Incue]
- Offset 2 - Normally represents the ‘Slate’, or the time before the first frame of Active Video.
- By default is set to: 00:00:00:00
- If there is a pre-roll, you might want to set Offset 2 just after the pre-roll ends
- Overall Offset (1+2) (Video Offset 1 + Video Offset 2 is [Offset 1 value + Offset 2 value]
- Default to Video Offsets - matches the subtitle file timecode to the video timecode
- Set - Sets the values that you chose.
- Close - Closes the window [You have to set the offsets, or else you will lose those values.]
Stretch
Sometimes you need to change the subtitle in and out times relative to each other. This tool allows you to either Stretch or Compress the times for whole subtitle file. A common reason for this is due to video rate conversions that cause distortions in the runtime of the video.
WARNING: this is an advanced feature and should be used with care. There is an advanced Undo (Alt+Z) function if you need it.
Check list before using this feature:
- Make sure you know what the change needs to be.
- Make sure you understand why you need to make the change.
- Make sure there aren’t any other methods that you could use, before attempting to change the subtitle file, such Align.
- This feature will heavily alter the subtitle file, please make a back-up copy of the subtitle file before starting.
- Use File Duplicate to make a copy in order to have a before and after copy of the file present in the timeline for comparison.

Tools → Timing Tools → Stretch [need to explain the difference]
Or
Right click in the Timeline[not on existing title] and select Timing → Stretch
Or
Click on the three dots at the top of a text column and select Timong Tools → ** Stretch**
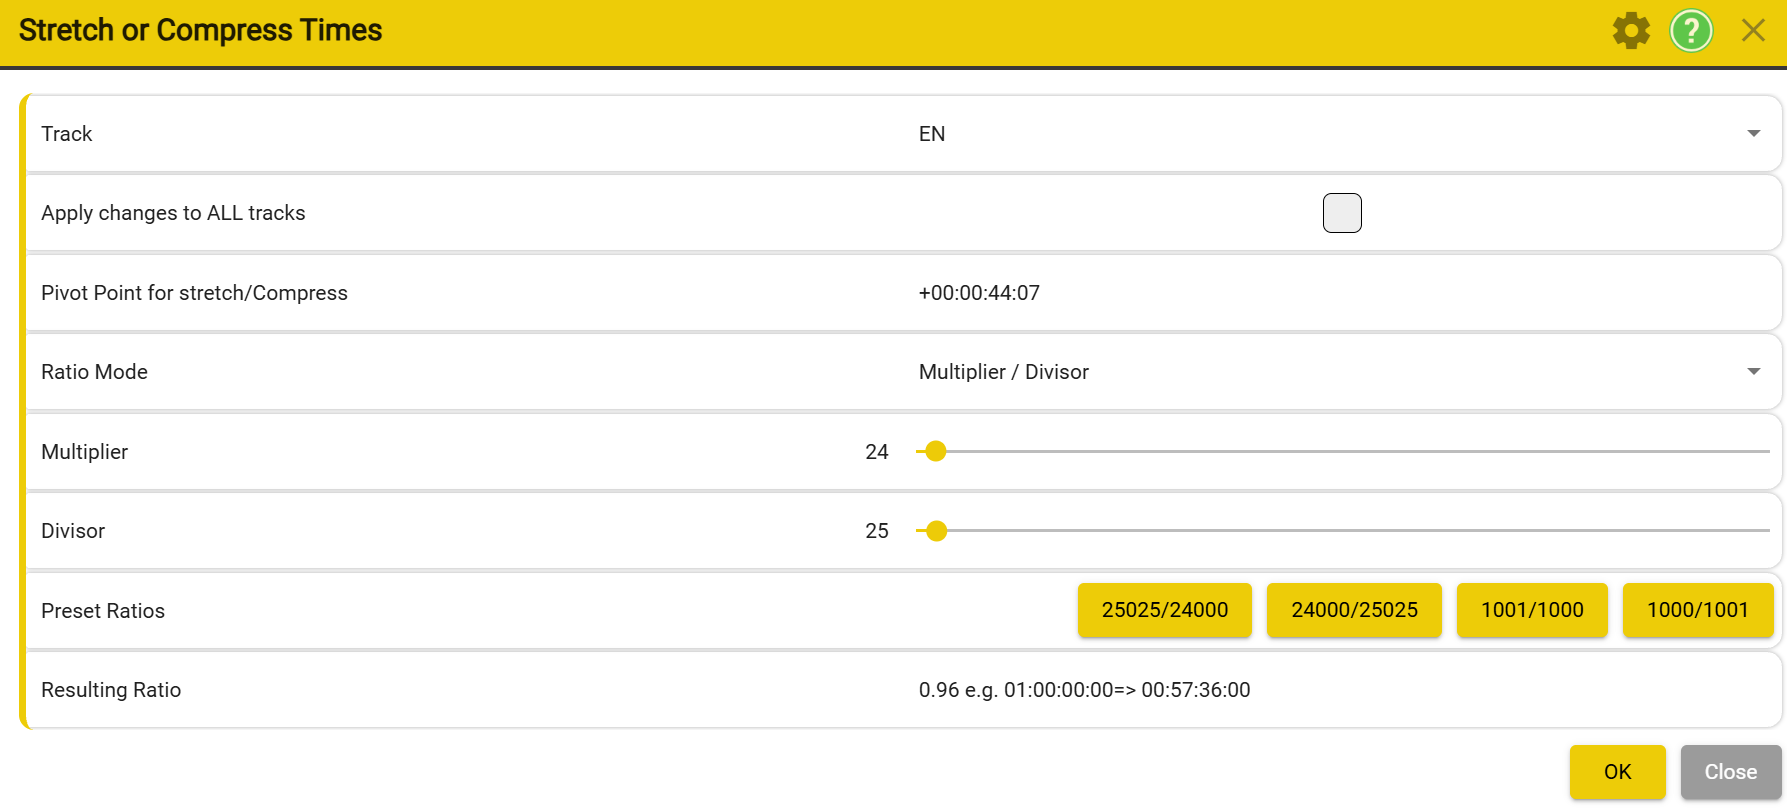
- Track - Allows you to select which track you want to adjust intervals
- Apply changes to ALL tracks - If checked, it will apply changes to all tracks. - Unchecked by default.
- ! This will include your back-up/original track! Make sure you want to modify ALL tracks, before checking this box.
- Pivot Point for Stretch/Compress - This will be timecode in the video that will remained unchanged.
- ! In general, this point is in the first frame of the active video.
- !! In the case where the media contains a pre-roll, you should start after the pre-rolls.
- Ratio Mode - Allows you set the ratio that will be used for Stretching/Compressing
-
Multiplier/Divisor - allows you to set two values that determine how the ratio is being calculated.
-
Use the left and right keys for fine adjustments
-
Tab and Shift+ Tab will move between the Multiplier and Divisor settings
- Multiplier - Sets the top value of the conversion ratio.
- Divisor - Sets the bottom value of the conversion ration.
- Number - allows you to set one value that determines how the ration is being calculated.
- Preset Ratios - Stellar provides 4 preset ratio values. - Hover of the guttons to see a more setailed description of each one.
These values can be edited by clicking on the **Cog Wheel **Icon top right. This will open the Timing Tools Widget settings window.
- Stretch settings contains 4 rows. Each row contains two sections: Ratio Preset and Title for Preset.
- Ration Presets - allow you to enter a ratio as a fraction or a decimal.
- Title for Presets - allow you to enter a description for their corresponding ratios. This text will also appear as a tooltip when hovering that Preset.
- Resulting ratio - Shows the result of the currently selected ratio.

| Ratio | Hour | Result | Action | |
|---|---|---|---|---|
| 0.96 | 01:00:00:00 | 00:57:36:00 | Stretch | |
| -0.96 | 01:00:00:00 | -00:57:36:00 | Compress? |
Video Timecode
Tools → Timing Tools → Video Timecode
Or
Right click in the Video Area → Video Timecode
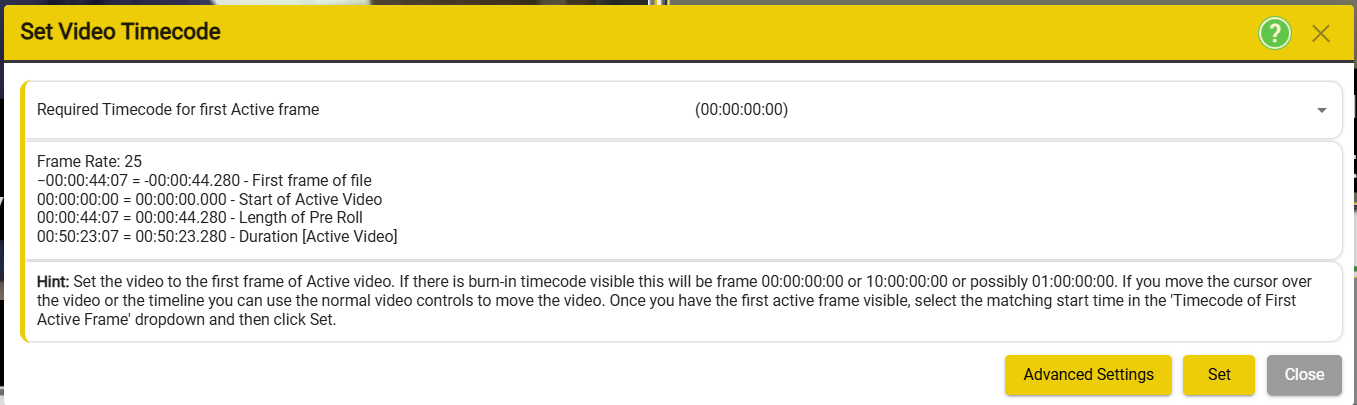
When Stellar Create imports a video, it tries to read the timecode from the original file. If this fails for any reason or there is no timecode in the file, you may need to set the timecode of the video to match the timecode of Stellar.
This is important because the timecode in Stellar is what sets the timecodes for all the subtitle or script elements in your file.
Basic operation:
- Set the video to the first frame of Active video.
- If there is burn-in timecode visible this will be frame 00:00:00:00 or 10:00:00:00 or possibly 01:00:00:00.
- Use the normal video cotrol hotkeys of if you move the cursor over the video or the timeline you can use the normal video controls to move the video.
- Once you have the first active frame visible, select the matching start time in the 'Timecode of First Active Frame' dropdown and then click Set.
- Click on the Set button
Options - including Advanced section.
- Required Timecode for first frame – Select the correct timecode for the fist frame of active video.
- Video Frame Rate (FPS) - Use the drop down list to set the FPS if you know it.
- Offset 1 - First Active frame of Video
- Offset 2 Negative Preroll/Slate length - the length of the video pre-roll/slate.
- Capture Offset 2 from video position - if ticked then offset 2 will be calculated to allow for any slate or colour bars on the front of the video file.
- Change Text file offsets - Check if you want to change all Text files offsets in the Task to match the video timecode. Checked by default.
- **
- Check “Capture Offset 2 from video position”
- Move the video timecode, using the normal video controls, to show the first Active frame of the video
- Enter the burnt in Time Code you see on the video into “Start Time Code of Active Video” (or select from the dropdown above)
- Click on the Set button
** 8. Summary area – Shows what values will be applied when you click on the Set button. ( Does this transform from a TC in seconds to a TC in frames?) 9. Set - Sets the values that you chose. 10. Close - Closes the window [You have to set the offsets, or else you will lose those values.]
Recut
Tools → Timing Tools → Recut
**Or **
Right click in the Video Area → Recut
**Or **
Click o the Recut button on the toolbar - if present.
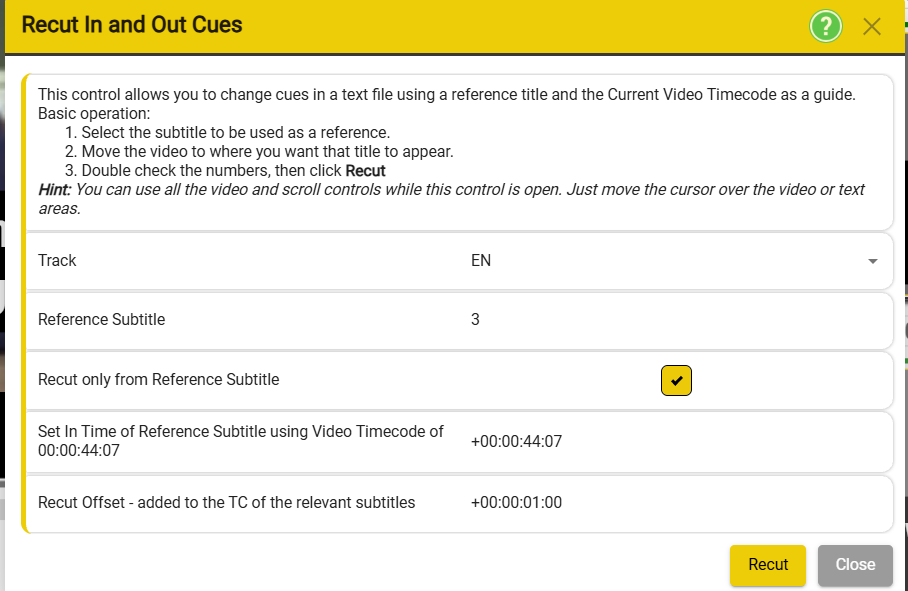
This control allows you to change cues in a Subtitle or Script file using a reference title and the Current Video Timecode as a guide. Use recut if the subtitle file or script and video timecode don't match.
For example the video has a start timecode of 10:00:00:00 hours but the subtitle file was created with a start time of 00:00:00:00 hours.
Recutting will change the times in the actual file. Changes can be undone using the undo key (Ctrl + Z).
Basic operation:
-
Select the subtitle to be used as a reference.
-
Move the video to where you want that title to appear.
-
Double check the numbers, then click Recut
You can use all the video and scroll controls while this control is open. Just move the cursor over the video or text areas or use the hotkeys..
- Track - Use the drop-drown menu to select the track that will be recut.
- Reference Subtitle - Allows you to select which Subtitle will be used as reference.
- Recut only from Reference Subtitle - Unchecked by default
- If checked, only the refence subtitle and the following subtitles will be Recut.
- Set the Time of Reference Subtitle using Video Timecode of [value]
- Can be set by moving the video to the point where the Reference subtitle should start
You can move the video even with the Recut dialog open. Use the normal video control hotkeys, or move the mouse pointer over the video and use the scroll wheel.
This allows you to fine tune the recut time.
- Recut Offset - Displays the change (positive or negative) that will be applied to all selected in and out time cues.
- Recut - Recut the values that you chose.
- Close - Closes the window [You have to set the offsets using the Recut[6] button, or else you will lose those values.]
Auto recut
Tools → Timing Tools → Auto Recut
- Method - Allows you to select the method that will be used to automatically recut the subtitles. Use the drop-down list to chose between the available options.
- Run Automatic Speech Recognition (ASR) - will use Automatic Speech Recognition to match the subtitles and the video speech and then the perform the recut process.
- Use existing transcript file (ASR file) - will use an existing transcript file to perform the recut process.
- Based on the method selected at point 1:
-
Run Automatic Speech Recognition(ASR) - you will be able to selected a language from a drop-down menu.
-
Use existing transcript file - you will be able to browse for an existing transcript file. Use the file browser to select your file.
-
Subtitle file - Allows you to select the subtitle file that you want to recut.
-
Output subtitle file - Allows you to select file path and title of the resulting subtitle file.
-
Alignment mode - Allows you to select the alignment mode. Use the drop-down list to select from the available options:
- Group - Will recut whole sections of subtitles by the same time.
[TIP - Use this method where simple video edits have been made. (Add or remove bumpers and advert black.)]
- Individual - Will recut each subtitle separately.
-
Min Delta - Only available in Group Alignment Mode - Set how large a change must be before a recut is done. For example, if this option is set to 3 seconds - any timing changes which are less than 3 seconds will be ignored.
-
Round changes to whole seconds - If checked, any changes calculated will be rounded to the nearest whole second. Use this option if the edits are likely to be in whole seconds due to the addition or removal of bumpers or advert black.
-
Add or Remove Content Warnings - If checked, any content warning messages in the first 10 seconds of active video will be processed.
- If there is an audio warning but no subtitle, a subtitle will be added.
- If there is a subtitle but no audio warning, then the subtitle will be removed.
-
Start - When you have set the values that you wanted, press the Start button to start the Auto Recut process.
-
Close - Closes the window [You have to start the process using the Start[9] button, or else you will lose the values and settings that you have entered.]