Subtitle Tools Plugin
Subtitle Tools Plugin
The subtitle tools plugin adds a range of new tools to Stellar Create.
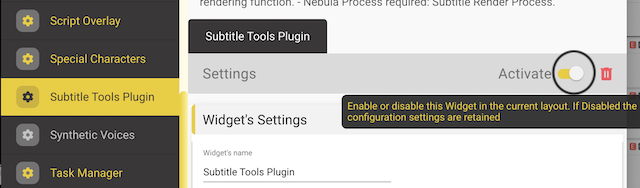
You will only see this menu option if the Subtitle Tools plugin is added to your current Layout.
Render Subtitles
Tools → Subtitle Tools → Render Subtitles
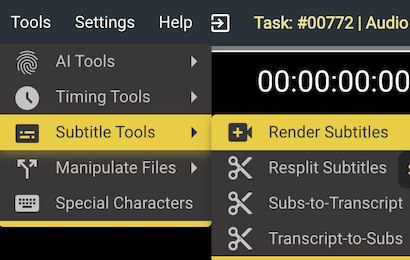
If the Subtitle Tools options do not appear by default, you can add them to Subtitle Tools Menu by going to Settings → Widgets → Subtitle Tools Plugin → Activate.
Rendering subtitles is the process of taking text, plus some style information, and creating an output that combines video, audio and subtitles in a single media file.
This could be burnt in subtitles or a DVB transport stream.
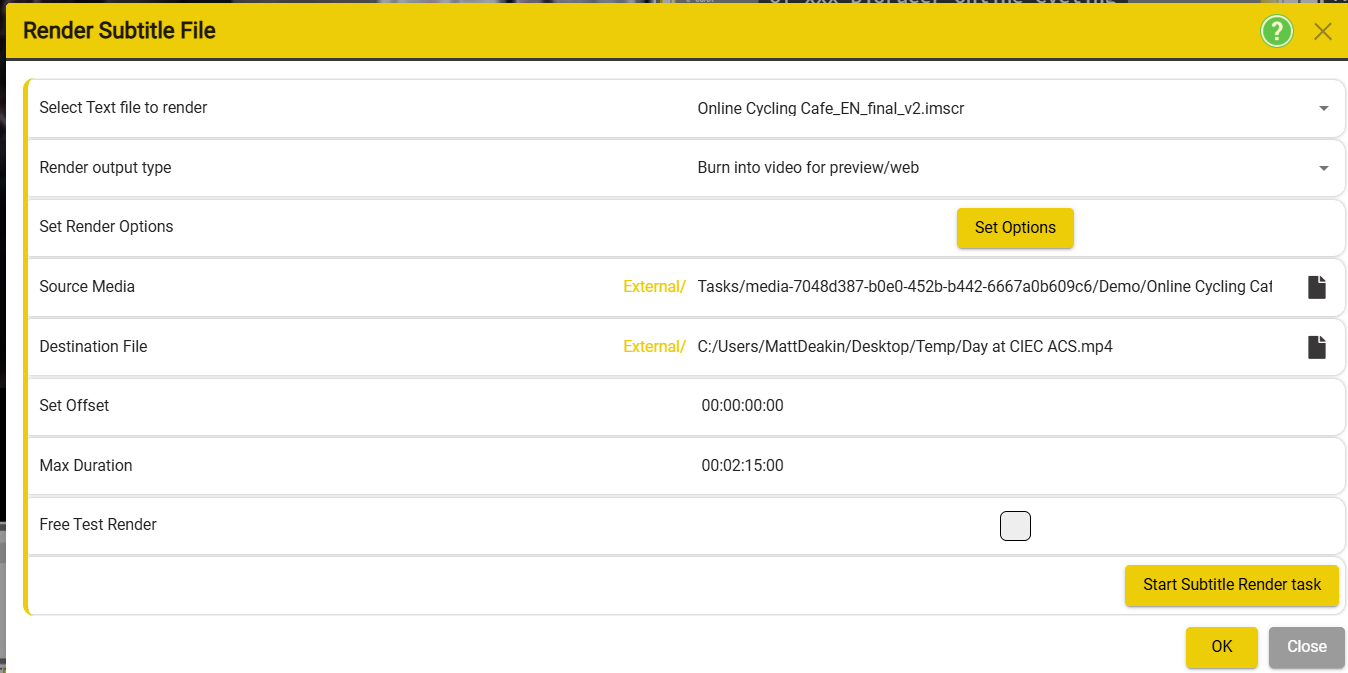
There are many different formats used to deliver subtitles with media and the Subtitle Render tool supports many of these.
- Select Text file to render - Use the drop-down list to select the file that you want to render.
- Render output type - Use the drop-down list to select the file type of the output:
- Mov video file containing subtitles with clear backgrounds - used for overlaying in other professional video editing tools
- Subtitles burnt-in to the video for Broadcast – uses full resolution original video media -most video formats supported
- Subtitles burnt-in to the video for preview or web – uses lower resolution media and only supports .mp4 format
- Program Stream File : DVB Bitmap subtitles as raw PES packets, suitable for muxing into DVB TS using various muxing tools
- DVB Stream File: DVB Bitmap subtitles as a .dvb file, suitable for muxing into DVB TS using various muxing tools.
- Transport Stream File – Subtitles only: DVB Bitmap subtitles as a .ts file, suitable for muxing into DVB TS using various muxing tools.
- Transport Stream File – Full stream : DVB Bitmap subtitles as a .ts file, suitable multiplexed into DVB TS ( TS input file required)
- Powerview subs – A transport stream file containing only subtitles
- Powerview subs muxed into TS – subtitles added to an existing transport stream file containing video and audio ( TS input file required).
- Powerview subs as an IMT file – subtitles only in the IMT file format.
- Set Render Options - Use this button to set the enter the Render Options window.
- Destination File - Allows you to select the path and the name of the destination/output file
- Set Offset - If required set a timecode offset to be added to the subtitle start times
- Max Duration - Set to a short time if you want to do a test render of the first few minutes rather than the whole program.
- Free test render - If selected the output will be free of charge but spoiler graphics will be added along with the text.
- Start Subtitle Render Task - Starts the process using the values that were set above.
**Controls **
**Start render task - **start the rendering process. This will run as a background task.
OK - Saves the settings without rendering
Close - Closes the window
Render Options

Output Resolution - allows you to select the output resolution
Aspect Ratio - allows you to select the output Ratio
Antialiasing - allows you to turn antialiasing on/off

You can activate the Safe Area UI by right clicking on the video → Overlays → Show Safe Area
| Show Safe Area | Hide Safe Area |
|---|---|

Allows you to set the padding of a character as a percentage of and EM square/quadrant.
| 1 EM square | 1 EM square |
|---|---|
 |  |
| Font: Perpetua | Font: Calisto |

Font Family - You can type the font family that you want in the text input box bellow.
Font Weight - You can choose the weight of the font by using the drop-down list bellow.
Size as a percentage of screen height [value] - Use the slider to select a value.
Outline Width as a percentage of EM square [value] - Use the slider to select the value.
Shadow type - Use the drop-down list to select one of the available options.

Box position relative to line as a percent of EM: [value] - Use the slider to select the value.
Box height as percent of EM: [value] - Use the slider to select the value.
Ghost Alpha Value in percent: 50 - Use the slider to select the value.
Box Type - Use the drop-down list to select from the options.

Line position relative to base as a percent of EM:[value] - Use the slider to select the value.
Line height as a percent of EM:[value] - Use the slider to select the value.
Default alignment - Use the drop-down list to select from the existing options.

Subtitle PID -
Subtitle Page ID - Different Page IDs can be used when you want to transmit subtitles
Include the DDS Segment - Select if you want to include the Display Definition Segment
Output Resolution - Use the drop-down to select an output resolution
Maximum object size in bytes - Sets the maximum object size in bytes.
Maximum PES size - Sets the maximum size for Packetized Elementary Stream packets which are carries the DVB subtitle stream in the MPEG-2 Transport Stream
Subtitle Bitrate - Set the subtitle bitrate
ISO language code - Set the language code for the subtitle according to ISO 639-1 Code
Subtitle type -

Subtitle PID -
Subtitle Bitrate - Set the subtitle bitrate
ISO language code - Set the language code for the subtitle according to ISO 639-1 Code
Set the Transport Stream Output bitrate.
Resplit Subtitles
Tools → Subtitle Tools → Resplit Subtitles
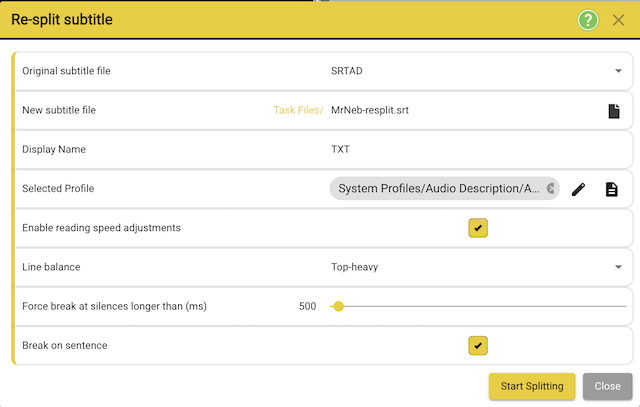
Stellar offer a Re-Split Tool which can take an existing subtitle file and resplits the text into a new set of subtitles, based on a different set of layout and timing rules.
Original subtitle file - Allows you to select a subtitle file from the ones already existent in the Task.
- If the file is not in the Task, you will have to load it into the Task using Files → Import → Text File
- Or you can just drag and drop it into Stellar Create
New subtitle file - Allows you to select the location and the name of the output file. Defaults to the same path as the original subtitle file, appends -resplit to the name of the original subtitle.
- By default the new file will be added to the current Task.
- You have the option to select a different file format for the new file. The default is the same format as the input file.
Display name - Allows you to set the name that will appear at the top of the Subtitle column and on the Timeline track when the file is loaded.
Select Style Profile - Allows you to select the Style Profile. This sets the parameters that control the split process for the new file.
**Enable reading speed adjustments **- allows the process to change the duration of the subtitles compared to the original.
Line balance - set if you want the new subtitles to be top-heavy or bottom-heavy.
**Force break on silences **- set the maximum silence time before a new subtitle break is enforced.
**Break on sentence **- Force a subtitle break on end-of-sentence punctuation.
**Controls **
Start Splitting - Stars the process using the values that you have previously set.
Close - Closes the window.
Subs to Transcripts
Tools → Subtitle Tools → Subs-to-Transcript
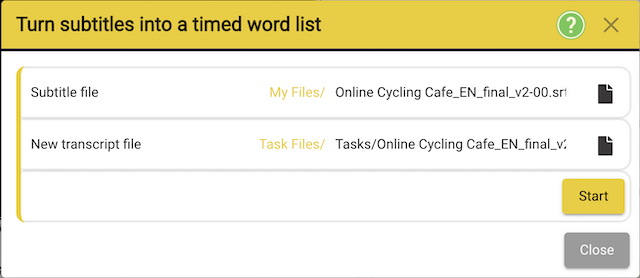
Convert subtitles into a timed word list. This process will use the subtitle timings, word lengths and calculated reading speed to estimate a time for each word. The output will be in the Yella Timed Wordlist JSON format.
- Subtitle file - Allows you to select the subtitle file that will be converted.
- New Transcript file - Allows you to select the path and the name of the new transcript file. [ the file ending will be .json]
Transcript to Subs
Tools → Subtitle Tools → Transcript to Subs
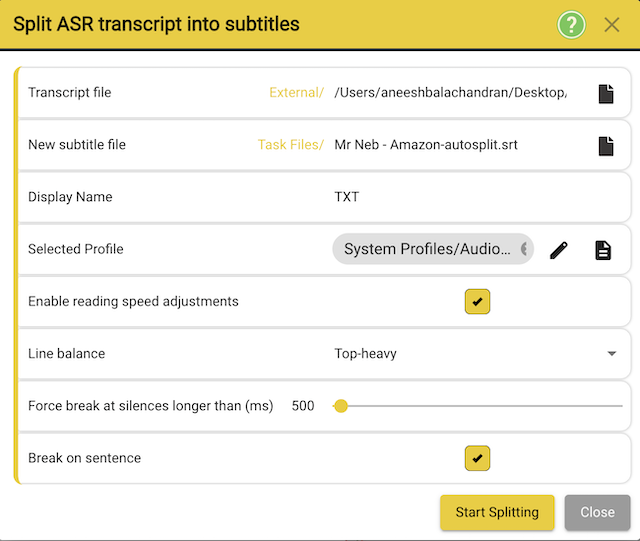
The Split tool takes an existing timed word list (transcript), for example from a speech to text service (ASR) and splits the text into a set of subtitles, based on some splitting and timing rules.
- Original transcript file - Allows you to select a transcript file from the ones already existent in the Task.
- If the file is not in the Task, you will have to load it in the Task using Files ->Import ->Text File
Original transcript file - Allows you to select a transcript file from the ones already existent in the Task.
- If the file is not in the Task, you will have to load it into the Task using Files → Import → Text File
- Or you can just drag and drop it into Stellar Create
New subtitle file - Allows you to select the location and the name of the output file. Defaults to the same path as the original subtitle file, appends -resplit to the name of the original subtitle.
- By default the new file will be added to the current Task.
- You have the option to select a different file format for the new file. The default is the same format as the input file.
Display name - Allows you to set the name that will appear at the top of the Subtitle column and on the Timeline track when the file is loaded.
Select Style Profile - Allows you to select the Style Profile. This sets the parameters that control the split process for the new file.
**Enable reading speed adjustments **- allows the process to change the duration of the subtitles compared to the original.
Line balance - set if you want the new subtitles to be top-heavy or bottom-heavy.
**Force break on silences **- set the maximum silence time before a new subtitle break is enforced.
**Break on sentence **- Force a subtitle break on end-of-sentence punctuation.
Controls
Start Splitting - Stars the process using the values that you have previously set.
Close - Closes the window.