Meta Tag Lists
Meta Tag Lists let you build reusable sets of metadata tags for use across Stellar. Tags can be used for compliance, generic tagging of media, QC, subtitling, audio description (AD), voice-over (VO), and dubbing files.
Tags are attached to files using the .yumeta format, a compliance file type built on a JSON structure. A yumeta file can have one or more Meta Tag Lists assigned to it, allowing you to tag and categorise elements within that file.
This article covers how to create a yumeta file, create and manage Meta Tag Lists, add and edit tags, create Meta Types, assign a Tag List to a file, insert tags and comments, and export your tag data.
Creating a Yumeta File
To create a new yumeta file:
- Go to Files → Text Files → New.
- Select the option YU Meta as the file format
- Click on Create
Creating a Tag List
To access and manage your Meta Tag Lists:
- Go to Tasks → Manage Tasks → Stellar Manage → Meta Tag Lists.
From here you can create and manage your Tag Lists. To create a new Meta Tag List, press the + button. This opens the Create New Meta Tag List window, which contains the following elements:
| UI Element | Description |
|---|---|
| Name | The name of your Tag List |
| Allow User Addition | Toggles whether users can add their own tags to the list |
| Add Entries | Adds more entries to the tag list |
| Import | Imports a tag list from CSV or JSON |
| Export | Exports a tag list to CSV or JSON |
| Search Tag | Searches for a specific tag in the current Tag List |
| Meta Tags tab | Manages the current tags in the Meta Tag List |
| Meta Types tab | Allows adding Meta Entry Types |
| Save | Saves the entry |
| Cancel | Cancels the action |
Creating Tags from Stellar
This option is only available if the Tag List associated with the file has Allow User Addition enabled.
- After creating a YU Meta file in Stellar, select the
 button.
 - Press
 to create a new tag.
 - Complete the tag details:
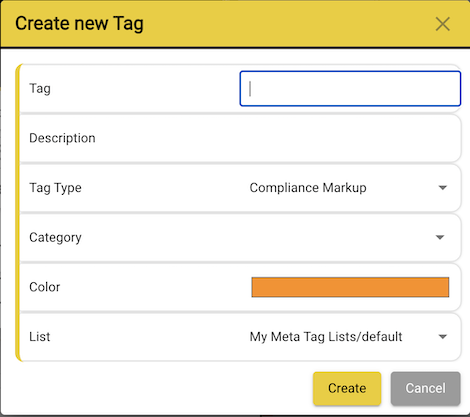
| UI Element | Description |
|---|---|
| Tag | The tag name |
| Description | The tag description |
| Type Type | Manual QC or Compliance Markup |
| Category | The category the tag belongs to |
| Color | The color assigned to the tag |
| List | The Tag List the tag will be saved to |
| Manual QC – Severity | The severity level of the QC tag (Error, Warning, Info) |
| Create | Creates the tag |
| Cancel | Cancels tag creation |
- Once created, the tag is inserted into the currently selected Meta Entry and added to the Tag UI.
Creating Tags from the Manager
If you don't already have a Meta Tag List, create one first using the  button.
If you already have one, press the  icon to open the Edit Meta Tag List window.
- Press
 to open the Add Meta Tags window.
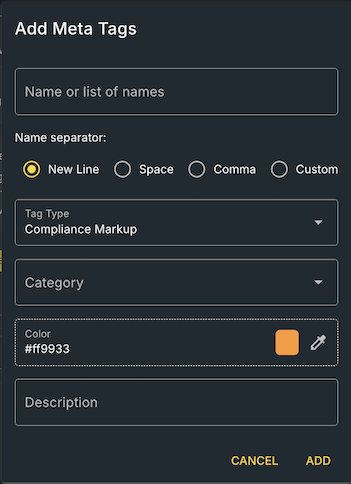
- You can add multiple tags at the same time.
- Select the separator to use when entering your list of tags.
- Select the tag type (Manual QC or Compliance)
- Type a category name and press Enter to create a new category, or choose an existing category from the dropdown.
- Select a colour for the tag.
- Add a description for the tag.
- Press ADD to save your new tag or tags.
Editing Tags
- Press the pencil icon next to the tag you want to edit.
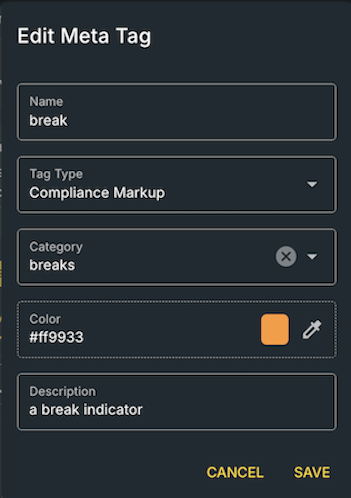
- Make your changes.
- Press Save when you're done.
Creating Meta Types
Each yumeta entry can have a Meta Entry Type.
- In the Edit Meta Tag List window, select the Meta Types tab.
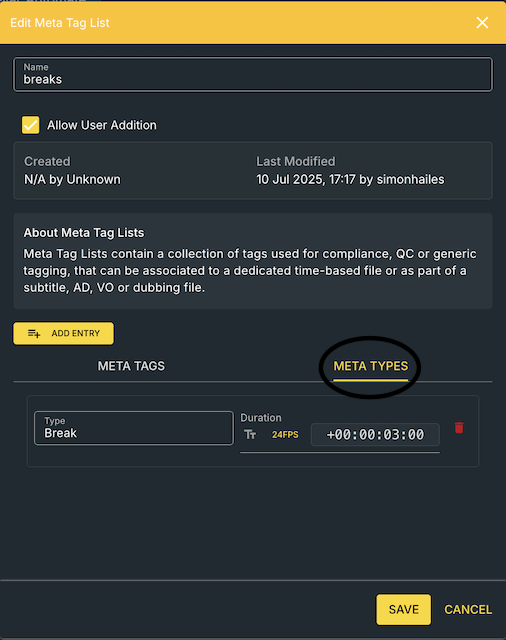
- Enter a name for the type.
- Set its default duration.
- Press Save when you're done.
Assigning a Tag List to a Yumeta File
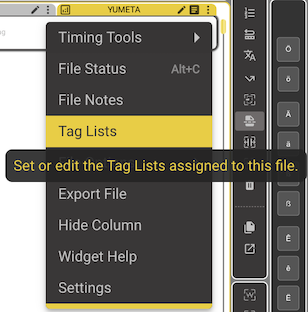
- Right-click the header of your yumeta file and select Tag Lists.
- Press
 to add one or more Tag Lists.
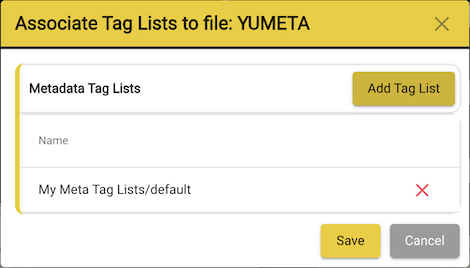
- Browse for the Tag List you want to add, press OK, then Save.
File Overview & Properties
Open the file's Status Window by clicking on the  icon.
icon.
After the window opens, use the tabs on the left side to view more details about the file:
- Overview
- Titles
- Properties
1. Overview
Shows a summary of the file's classification and title information:
- Titles
- Meta Types
- Meta Categories
2. Titles (QC)
Use this tab to work with the file's titles and also allows you to fix or ignore any errors detected:
- Cut Titles
- Copy Titles
- Paste Titles
- Manage Titles
- Export Titles
3. Properties
Shows the file's settings and metadata:
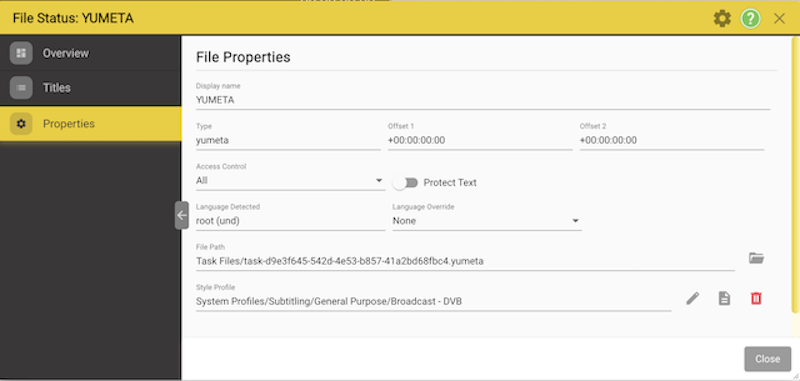
- Display name
- Type
- Offset 1
- Offset 2
- Access Control
- Language Detected
- Language Override
- File Path
- Style Profile
Exporting to CSV or JSON
- Go to Actions → Export Titles to export your list to CSV or JSON.
Meta Tag List Actions
| Action | Purpose |
|---|---|
| Name | Set the Tag List's name |
| Allow User Addition | Let users add their own tags to the list |
| Add Entries | Add one or more new tags to the list |
| Import | Import a tag list from CSV or JSON |
| Export | Export a tag list to CSV or JSON |
| Search Tag | Find a specific tag within the current Tag List |
| Meta Tags | Manage the tags in the Meta Tag List |
| Meta Types | Add and manage Meta Entry Types |
| Save | Save changes |
| Cancel | Discard changes |